Amazon Prime Day is underway, and we've found some tempting deals on our favorite stargazing equipment at Amazon. The sale ends at 23:59 tonight, Wednesday, October 7, 2026, and we'll keep an eye on the deals so you can keep an eye on the skies.
Fall is a fantastic time to stargaze, with meteor showers, full moons, constellations and planetary oppositions — some of which you can only see with binoculars or a telescope. Shop the best deals on telescopes and binoculars below.
These small smart telescopes are ideal for deep-sky astrophotography, particularly for large nebulas and galaxies like the North America Nebula and the Andromeda Galaxy. They're an easy introduction to astrophotography, and you can also photograph the Moon and Sun, too.
Although we haven't reviewed this exact model, you can read ourreview of the S30 Pro,which we named the best portable smart telescope.View Deal
If you want a portable smart telescope that excels at wide-angle shooting, the Dwarf Mini is the ideal choice, and you can save $59 right now at Amazon.
Its portability is the killer feature here, as it's around half the weight of the Seestar S30 we mentioned above. Plus, the wide-angle camera is much wider, making it better for Milky Way landscapes, constellations and bigger portions of the sky.
While this isn't marked as a Big Deal Day price, it's the lowest we've seen it at Amazon since March.
The Vaonis Vespera Pro is one of the best smart telescopes on the market, with the latest Sony Starvis 2 sensor, a massive 11-hour battery life and is ideal for deep-sky astrophotography.View Deal
Not to be confused with the Celestron AstroMaster LT 70AZ, which is smaller and gives you a slightly wider view. The standard AstroMaster 70AZ, which is on offer here, has a longer focal length, which is better suited to spotting planets, particularly Jupiter and Saturn. This telescope usually sits around $179, and this is the cheapest we've seen it since June.View Deal
Celestron StarSense Explorer LT 80AZ: was $249.95 now $199.99 The Celestron StarSense range is really useful for total beginners, as the smartphone dock and accompanying app work out where the telescope is pointing, then show arrows on the screen to guide you towards certain objects.
So, rather than "Here's a telescope, good luck finding Jupiter", the StarSense is much more "Here's what's visible tonight. Pick something, and I'll show you where it is".
If you can afford to stretch your budget, this is a better option than the AstroMaster 70LT we listed above. It has better light-gathering capabilities thanks to the wider aperture; it's a lighter package overall and it includes a 2x Barlow lens.
If you're looking for more of an intermediate-level telescope, the Celestron AstroMaster 130EQ-MD is a great option, and you can save $58 right now.
The EQ mount has a bit of a learning curve, but once you've got it set up, it's a much more accurate way of tracking objects across the night sky. Plus, this version comes with a motor drive, so there's no manual adjusting needed.
The 130mm aperture is great for viewing brighter deep-sky objects, and the moon looks beautiful, as do Jupiter and Saturn. View Deal
Celestron NexStar 102SLT: was $639.95 now $479.99 If you like the intelligence of a smart telescope but want an observational telescope, a GoTo is the perfect combination. Once the telescope is aligned, you use the handset to select a celestial object from the list, and the telescope automatically orients itself toward your chosen object.
This telescope has a 102mm aperture, which is excellent for observing larger deep-sky objects, the moon, and planets. It's user-friendly without feeling too much like a beginner telescope, and it's an excellent price.View Deal
Binocular deals
These massive, powerful astronomy binoculars are the closest thing to a telescope that isn't actually a telescope. With 25x magnification and 100mm objective lens diameter, they're perfect for getting detailed views of the moon and night sky.
Be warned, they're very big and very heavy, so you'll need to mount them on a tripod. They're for dedicated astronomy users, so if you want something lightweight and portable, check out some of the other options in this guide.
For serious stargazing, the Celestron SkyMaster Pro 15x70 is ideal for getting detailed views of the moon, constellations and spotting Jupiter's moons. They have excellent optical quality, and the solid build makes them as rugged as they come. That said, you'll need to mount them on a tripod due to their size and weight.
This price is the cheapest we've seen them since April.View Deal
If you're looking for astronomy binoculars on a budget, these 12x60s from Celestron are ideal. They're a little big to use handheld, but they'll give you great views of the moon and stars, and you'll be able to spot Jupiter's moons.
Celestron Nature DX ED 12x50: was $279.95 now $234.99 Binoculars with viewing power and excellent optical quality. These binoculars have ED glass to eliminate chromatic aberration, which is particularly useful when viewing the moon. They're more of an investment than non-ED glass, but they're worth every cent and will last a long time.
The Celestron Regal ED 10x42 is one of the best multi-use binoculars we've tested. The ED glass and field-flattening technology produce clear, sharp views across the entire frame, and the 10x42 spec is good for spotting wildlife and sweeping across the sky to get a closer look at the moon and stars.
Apple today added the 2019 4K iMac to its list of vintage products, which means repairs can only be done if Apple has the parts available.
Products are added to the vintage list five years after they were last distributed for sale, and they're moved to the obsolete list at the seven-year mark. Vintage products can be repaired at Apple Stores and by Apple Authorized Service Providers if the parts are available, but that's not guaranteed. Devices that are obsolete are not eligible for repair and Apple no longer makes repair components.
The 2019 iMac preceded the colorful, redesigned M1 iMac that came out in 2021. The machine featured a 21.5-inch Retina 4K display and the standard silver iMac design. The base model was equipped with an Intel Core i3 processor, 8GB RAM, and a 1TB hard drive. Pricing in 2019 started at $1,299.
The 2019 27-inch iMac that was sold alongside the 21.5-inch model was added to the vintage list in July 2025, but Apple sold the smaller model for a longer so it didn't previously qualify as vintage.
With fall now upon us, many of us will be dusting off our binoculars and telescopes ready for the longer nights this season brings. Earlier sunsets mean more stargazing hours, and we'll start to see the return of some favorite celestial sights and deep-sky objects that we haven’t seen since before spring.
Fall is also an excellent time for casual stargazers, with the earlier evenings and cooler temperatures offering a comfortable compromise before we head into those freezing winter nights when we can't feel our toes. Don't worry if you're just starting out and don't have any gear yet, as many of this season's celestial objects are visible with the naked eye — and some are actually best viewed that way.
This September, October and November are great times to view the distant planets at opposition, catch several meteor showers and photograph far-flung galaxies and nebulas with your smart telescope. Plus, November brings the first full supermoon of the year. So, grab your telescope, your headlamp and a cozy sweater, and let's see what lies ahead.
Lunar & Planetary events
Neptune at opposition
(Image credit: Getty Images)
Neptune reaches opposition on September 26 at 02:00 UTC, which is the best time to view it at its brightest, magnitude +7.8. Unfortunately, the full moon will somewhat ruin the party, and Neptune isn't particularly easy to spot at the best of times. That said, the opposition window lasts for several weeks, so waiting a couple of weeks to observe during the new moon week won't make any noticeable difference.
You'll need a good telescope to spot the big blue planet — at least a 6-inch aperture, although an 8-inch or bigger will give you the best chance. Make sure you have a good quality, high-powered eyepiece (something like a 6mm or 9mm) or a good Barlow lens to boost the magnification of your existing eyepieces.
But even with high magnification, Neptune will only appear as a small disc with a bluish hue — you won't see any cloud bands or surface features, because it’s just too far away. Still, it's worth trying to get a glimpse anyway.
Saturn at opposition
(Image credit: NASA / Hubble)
A week later, on October 4 at 12:00 UTC, Saturn reaches opposition, shining at magnitude +0.3. It will be easily visible to the naked eye, although to see Saturn's rings or any of its largest moons, you'll need a telescope.
The moon will be just below 50% illuminated and doesn't rise until past midnight, so you'll have a good portion of the late evening to observe Saturn while it's high in the sky before the moonlight affects visibility. Even though the rings are only partially tilted, you can still make out a lovely golden oval around the planet, and in larger telescopes you'll be able to spot the Cassini division. We recommend a telescope with at least 4 or 5 inches of aperture, and a good quality, high-powered eyepiece to observe the finer details.
Full supermoon
(Image credit: Dawn Villwok-Joerg/Getty Images)
November 24 brings the first full supermoon of fall/winter, when the bright Beaver Moon will light up the skies, shining around 15% brighter than a normal full moon.
You can enjoy this moon without any gear whatsoever, but observing with binoculars or a telescope, or capturing its magnificence with a camera, makes the experience much more enjoyable.
Until then, you can catch the other full moons of the season on September 26 and October 26.
Uranus at opposition
(Image credit: ARTUR PLAWGO / SCIENCE PHOTO LIBRARY via Getty Images)
The third planetary opposition of the fall belongs to Uranus on November 25 at 23:00 UTC. But like Neptune in September, the almost full moon will dampen its visibility, so we'd recommend waiting until the new moon week.
Like the other outer planets, you'll need a larger telescope with an aperture of at least 6 or 8 inches to view Uranus, alongside a good quality, high-powered eyepiece for the best views. These larger scopes gather enough light to distinguish Uranus's turquoise color, although you'll need to go even bigger if you want to see its brightest moons.
Meteor showers
Draconids
(Image credit: Getty Images)
The first meteor shower of the season — and unlike most showers, which involve a lot of caffeine and an all-nighter, the Draconids are best seen in the late evening instead of the dead of night.
This meteor shower is active between October 6-10, peaking on the night of October 8-9. With the radiant point in Draco being highest at nightfall and the thin crescent moon not causing any interference, the best viewing hours are in the late evening before midnight.
These meteors are leftover debris from comet 21P/Giacobini-Zinner, and you can expect to see around 6-10 meteors per hour under ideal conditions.
Orionids
(Image credit: Mountain Light Photography Inc via Getty Images)
The Orionid meteor shower happens every October, when Earth passes through the trail of debris from Halley's Comet. In 2026, it's active between October 2 and November 7, with the peak occurring on the night of October 21-22. This shower brings between 10 and 20 meteors per hour under dark skies, radiating from the Orion constellation.
The waxing gibbous moon during the peak will add a fair bit of light pollution, but the moon will set between 03:12 am and 04:15 am depending on where in the States you're watching from, so you'll have a few hours before dawn to catch the darkest skies. You just need your eyes and clear, dark skies to see them, and a good astrophotography camera equipped with a wide-angle lens is perfect for capturing photos.
Taurids
(Image credit: Getty Images)
The Taurids meteor shower comes in two parts. The first is the Southern Taurids, active between September 10 and November 20, peaking on the night of November 4-5 (during a thin waning crescent moon). The Northern Taurids come slightly later and are active between October 20 and December 10, peaking on November 12 (during an even smaller waxing crescent moon).
The hit rate is one of the lowest of all the meteor showers, with only around 5 meteors per hour. However, the Taurids are known for producing bright, slower-moving fireballs that linger in the sky — making them a particularly appealing astrophotography target.
Peak viewing time will be around midnight, when the Taurus constellation reaches its highest point in the sky.
Leonids
(Image credit: Getty Images)
Radiating from the Leo constellation, the Leonids come from the dust and debris left behind by comet 55P/Tempel–Tuttle, which orbits the Sun every 33 years. They produce between 10 and 15 meteors per hour, and the shower period runs from November 6 to November 30, with the peak falling on the night of November 17-18.
The first quarter moon will set around midnight, making way for the best of the shower between midnight and 4 am in totally dark skies.
Star clusters and constellations
Pleiades (and Hyades)
(Image credit: Giulio Ercolani / Alamy)
A favorite among many stargazers, the Pleiades (M45), an open cluster known as the "seven sisters" in the constellation of Taurus, slowly returns to the night sky this fall. By October, it rises in the east a couple of hours after sunset and is visible from dusk to dawn from November. Although it's about 440 light-years from Earth, you can see it with the naked eye under dark conditions — even though it's usually just a faint, fuzzy patch — but binoculars or a telescope provide a much more impressive view.
As Greek mythology has it, the sisters — named Maia, Alcyone, Asterope, Celaeno, Taygete, Electra and Merope — were the daughters of the Titan Atlas and Pleione. The story is that Zeus transformed them into a cluster of stars to escape the relentless pursuit of the giant hunter Orion, who fell in love with the sisters and chased them for seven years. It seems he couldn't take the hint.
Look below the Pleiades, and you'll find their five half-sisters, the Hyades — an open cluster which makes up the V-shaped face of Taurus, the Bull.
The Pleiades are a fantastic target to capture with a smart telescope. If you want to stack multiple sessions across fall and winter, start in late November when they're high in the sky. You want an altitude of 50 degrees or higher, and ideally 60 degrees or more. The cluster itself is easy to capture, but the less atmosphere you're looking through, the more you can pull out that delicate blue nebulosity, which is what takes an image of the Pleiades from good to spectacular.
Another enemy of that lovely blue glow is the moon, so make sure you're imaging under completely dark skies with no more than around 25% moonlight. If you get a clear, moonless night, aim for 2-3 hours minimum to capture the faint nebulosity, and go for 3-5 hours for a really impressive image.
Pegasus
(Image credit: Getty Images)
The best time to see the Great Square of Pegasus is during the fall evenings between September and January, with October offering the clearest and highest views in the night sky.
This asterism is a large, prominent square shape made up of four bright stars in the eastern sky — Markab, Scheat, Algenib and Alpheratz — with the latter belonging to the neighboring constellation of Andromeda. The square is said to make up the body of the winged horse, and the four stars range from about 133 to 670 light-years away from Earth. Point a pair of binoculars at them, and they'll reveal many more stars that are not visible to the naked eye.
Cassiopeia
(Image credit: Getty Images)
Cassiopeia is one of the Northern Hemisphere's circumpolar constellations, so although it's technically visible all year, it's best seen during the autumn and winter months. Throughout the fall, it climbs higher and higher in the sky, reaching its upper culmination in mid-November, when it is best viewed between 9 pm and midnight.
Depending on its rotation in the sky, Cassiopeia appears as a "W" or "M" shape made up of five bright stars ranging from 19 to 425 light-years away and visible with the naked eye.
Cassiopeia was a vain, arrogant queen in Greek mythology, and after boasting that she and her daughter, Andromeda, were more beautiful than the Nereids, the gods placed her in the sky tied to her throne, where she spends half of the year upside down as punishment for her vanity.
The Owl Cluster
(Image credit: Stocktrek Images via Getty Images)
In addition to the constellation itself, there are some fun hidden objects within Cassiopeia that require binoculars or a telescope. The Owl Cluster (NGC 457) is a bright, open star cluster near the bottom-left star of the W shape, containing around 150 stars (although only 60 are identified as true cluster members), and is roughly 8,000 light-years from Earth. The blue and yellow "eyes" consist of the stars Phi Cassiopeiae (magnitude +5.0) and HD 7902 (magnitude +7.0).
You'll need a pair of astronomy binoculars to see it — go for 15x70 for a decent view, or 20x80 for an even better observation.
Caroline's Rose
(Image credit: Alan Dyer/StockTrek Via Getty Images)
Caroline's Rose (NGC 7789) is another open cluster in Cassiopeia, situated close to the last of the five bright stars in the "W" shape. Astronomer Caroline Herschel discovered the cluster in 1783 and it contains over 1,000 confirmed member stars, with estimates suggesting up to 3,000 potential stars.
It was named "Caroline's Rose" or the "White Rose" because its winding loops of stars and dark empty lanes resemble the petals of a cosmic rose, and it is estimated to be around 1.4 to 1.7 billion years old.
You can see it with a pair of binoculars under reasonably dark skies, but the best views will come from a telescope.
Deep-sky nebulas & galaxies
Andromeda galaxy
(Image credit: Getty Images)
Our closest neighboring galaxy, Andromeda (M31), is about 2.5 million light-years from Earth and may one day collide with the Milky Way ("one day" being a 50/50 chance around 10 billion years from now, according to new research). But until then, we can easily make do with observing from afar with binoculars and telescopes.
October and November are prime evening viewing time, with the galaxy reaching its highest point between 7 pm and 11 pm. Under clear, dark skies, it's the most distant object visible to the naked eye, appearing as a very faint smudge — provided you know where to look. Binoculars provide a marginally better view of a somewhat larger, slightly brighter faint smudge — we've managed to see it with a pair of 8x25s under dark skies — but for the best views, you want a telescope.
It's a great first target for beginners using a smart telescope, with the prominent dust lanes revealing themselves after 30-60 minutes. If you want more detailed images of the faint outer arms, leave it for 3-4 hours. Moonlight can wash out the faint galactic arms and dust lanes, so if possible, choose a dark night with minimal light pollution.
In Greek mythology, Andromeda was the daughter of the aforementioned Cassiopeia. After angering the sea god Poseidon, Cassiopeia (who was not exactly Mother of the Year) chained Andromeda to a rock as a human sacrifice to the sea monster, Cetus, that Poseidon had sent to ravage their kingdom's coast. Andromeda was saved by Perseus, who she then married, and after her death, Athena placed her in the stars as a constellation.
The Helix Nebula (NGC 7293) is a large planetary nebula around 650 light-years away in the constellation Aquarius. Often called the "Eye of God", it has a striking eye-like appearance, and it features thousands of comet-like radial filaments and complex gas rings.
It stays relatively low in the southern sky, with September being the best time to view or photograph before it gradually sinks over the coming months. Moonlight will completely wash out its faint outer gaseous ring, so it's best to shoot during a new moon (or when the moon hasn't yet risen) to get the best image possible.
The best hours to capture it are between about 10:30 am and 2 am, when it's either rising or at its highest. This should get you a pretty decent standard image, but if you want more detail, try to capture it over several nights to pull in the faint outer nebulosity and stack the images.
Triangulum Galaxy
(Image credit: Getty Images)
The Triangulum Galaxy (M33) is the third-largest in our local group of galaxies, behind the Milky Way and Andromeda. This stunning spiral galaxy — not to be confused with the Pinwheel Galaxy (M101), which is best seen in the spring — sits in the small Triangulum constellation about 2.7 million light-years from Earth and is a great astrophotography target.
Its peak viewing time is October to December, when its highest and clearest position is after dark in the late evening. Because it's so faint, you need a moonless night away from light pollution. The sweet spot for smart telescopes is around 90 minutes, but if you can shoot for longer or want to split your shoot across multiple nights, 2.5 to 4+ hours can bring out more detail in the core and spiral arm.
Heart and Soul Nebula
(Image credit: Getty Images)
The Heart and Soul Nebula is a nebula complex consisting of two massive emission nebulas located about 6,000 to 7,500 light-years from Earth in the constellation Cassiopeia. They are primarily made of glowing ionized hydrogen gas, darker cosmic dust lanes and trace amounts of ionized oxygen and sulfur.
Like most other nebulas, they aren't visible to the naked eye, so you'll need a telescope or a long-exposure astrophotography setup to see them. The Heart Nebula (IC 1805) is, unsurprisingly, named after its heart-like shape, while its neighbor, the Soul Nebula (IC 1848), has a more irregular shape with large cavities made by stellar winds.
If you're imaging the Heart and Soul with a camera or smart telescope, a total integration time of 6 to 12 hours will provide you with the cleanest details and most contrast in the faint gas structures. That said, 2 to 4 hours will give you a good basic stacked image.
As Cassiopeia is at its highest in the fall, this is the best time to see and photograph it with the least amount of atmospheric interference.
Ghost of Cassiopeia
(Image credit: Getty Images)
The Ghost of Cassiopeia, often referred to as the Ghost Nebula (IC 63), is a mixed reflection and emission nebula around 550 light-years away in Cassiopeia. Its eerie red glow is caused by its proximity to the nearby blue giant star, Gamma Cassiopeiae, which sits right in the middle of the constellation's distinctive 'W' shape. The star’s powerful ultraviolet radiation causes the hydrogen to emit a soft red glow, while the surrounding dust reflects the star's light in fainter blue hues.
Like the other celestial sights in Cassiopeia, autumn and winter evenings are the best times to see and photograph it due to its high altitude in the sky. As the nebula is so faint and elusive to capture, you can only see it with a smart telescope or a long-exposure astrophotography setup.
When it comes to integration time, the longer the better. Aim for 3-5 hours minimum, ideally 6+ hours if the skies allow, and avoid shooting during moonlight if you can.
The Celestron StarSense Explorer DX 130AZ is a 5.1-inch (130mm) f/5 Newtonian reflector, one of many 130mm f/5 reflectors offered by Celestron. The DX 130AZ is also one of two 130mm StarSense Explorer variants, the other being a tabletop Dobsonian. The optical tube here rides on an alt-azimuth tripod instead and uses a 2-inch focuser, but otherwise, there are no major differences.
The DX 130 AZ is certainly one of the better telescopes in the StarSense Explorer series; there are also several decent Dobsonians, a pair of decent Schmidt-Cassegrains, the merely acceptable DX 102 refractor, a 114mm Bird-Jones model and some small refractors that aren’t of much use.
The DX 130AZ is definitely on the small end of what can be called a "serious" instrument, but even under a fairly light-polluted sky, it’s big enough to show you plenty of deep-sky objects and, of course, stunning detail on the moon and planets.
Celestron StarSense Explorer DX 130AZ review
Celestron StarSense Explorer DX 130AZ: Design
(Image credit: Zane Landers)
130mm f/5 Newtonian reflector with a parabolic primary and flat secondary mirror
Manual alt-azimuth mount and tripod with StarSense smartphone dock — no motors
Two 1.25” eyepieces included (25mm yielding 26x, 10mm yielding 65x)
The DX 130 rides on the same alt-azimuth mount/tripod shared with the other StarSense Explorer DX models. It’s reasonably sturdy, with one major caveat: you can’t actually point the DX 130 straight up. When aimed above about 70 to 75 degrees, the tube crashes into the mount or the tripod legs.
However, there is a simple workaround here. Deliberately set the tripod up unlevel, which lets you reach the zenith without affecting the mount or the StarSense system at all. It looks a little silly, but it works. The tripod is fairly stable as long as you’re not in a windy spot. Loading the accessory tray with sandbags or diving weights, or filling the hollow aluminum legs with sand or foam, helps considerably if you’re willing to do a bit of DIY work.
The mount has slow-motion controls with small gears for fine adjustments. They have a fair amount of play in them, but since this telescope is really only meant to be used up to about 200x magnification or so, it doesn’t matter much. In practice, the author barely used the slow-motion controls and simply nudged the scope by hand. For aiming the DX 130AZ, a red dot finder is provided in addition to the StarSense Explorer tech.
The StarSense Explorer DX 130 AZ comes with two eyepieces: a 25mm (26x) and a 10mm (65x). These are three-element eyepieces, likely Konigs or reversed Kellners. They work acceptably; the 25mm is a little blurry at the edges, and the 10mm shows some chromatic aberration toward the edge, but both are reasonably sharp. The bigger problem is that the housings are all plastic and there are a lot of internal reflections as a result.
(Image credit: Zane Landers)
Better aftermarket eyepieces would be a wise investment, both for improved performance and a wider range of magnifications. We’d recommend a 6mm redline (108x), a 2x Barlow of some sort and a good wide-field eyepiece like the 24mm APM/StellaLyra UFF (27x), if you can afford it — the 6mm redline gets a bit closer than the provided 10mm eyepiece and offers a much sharper view, while the 24mm UFF is far crisper than the stock 25mm. With a Barlow lens and the 6mm, you can go up to 216x on the moon, planets and double stars — about the highest magnification this telescope can allow. Or you can choose your own eyepiece set to suit your needs.
Specifications
Optical design: Newtonian reflector Mount type: Manual altitude-azimuth with StarSense smartphone dock Aperture: 130mm (5.1 inches) Focal length: 650mm Focal ratio: f/5 Magnification: ~260x (highest useful) Included eyepieces: 1.25” 25mm (26x) and 10mm (65x), 50 degree apparent field Total kit weight: 18 pounds (8.16 kg)
The StarSense Explorer DX 130’s focuser is a 2.5-inch rack-and-pinion unit with a metal drawtube and plastic body. There’s some play in it, but it works acceptably well as long as you don’t overload it with too much weight. The focuser has adapters to accept both the provided 1.25” eyepieces as well as aftermarket wide-field 2-inch eyepieces, but at f/5, you really need a coma corrector of some sort to use the latter, which, along with the eyepieces themselves, will set you back quite a bit.
Being a Newtonian reflector, the DX 130 will usually need to be collimated for sharp images. Celestron doesn’t include a collimation tool, which is mildly annoying, but a basic collimation cap is cheap, easy to 3D-print, or can be improvised from a film canister. Overall, the DX 130 is lightweight and very portable, which is one of its real strengths — it’s easy to carry about, and the StarSense Explorer app will have no trouble plate-solving, even if you have to pick the scope up and carry it around the yard to avoid trees or other obstructions.
Celestron StarSense Explorer DX 130AZ: Performance
(Image credit: Zane Landers)
Sharp, detailed lunar and planetary views
Excellent wide-field deep-sky performance from dark skies
Light and quick to reposition around obstructions
The DX 130 shows a great deal of detail on the moon, down to features a few kilometers across, and it’s genuinely sharp. The focuser is a little coarse, but with some finesse it will reach focus even at high magnifications. The 130mm f/5 optics can handle up to about 250x magnification on a night of steady atmospheric conditions, though the best lunar and planetary views are usually found somewhere between 150-220x and the mount starts to get wobbly as you push towards the higher end of that range.
On the planets, the DX 130 handles shadow transits of Jupiter’s moons easily, shows all four Galilean moons as disks and even reveals the Great Red Spot. Saturn’s rings are obvious, along with a smattering of a half-dozen moons, and the Cassini Division is visible when the rings are tilted more open than they are at present. Uranus is also visible as a tiny greenish disk, though its moons are not. It’s a struggle to distinguish Neptune from a star at all, but the StarSense Explorer app will help you identify which blue dot it is in a sea of similar looking 8th-magnitude points.
(Image credit: Zane Landers)
One practical note: you do need to keep your phone screen dim and red while using this telescope with the StarSense Explorer app. The app has a red mode, but notifications, or your phone simply reverting to the lock screen, can flash the screen bright, and even at its dimmest a phone screen can affect your eyes’ dark adaptation quite a bit. But for most people this won’t be a serious problem if the screen is dimmed fully and used with a proper red filter — either a software solution or a physical red film.
As for deep-sky objects, the spiral arms of the Andromeda Galaxy and M33 look fantastic under a dark sky, though under light pollution only their cores are visible. Globular clusters such as M13 and M3 begin to resolve, while more difficult targets are harder going — M53 was tough from Bortle 5 but doable from Bortle 2 conditions. Under a bright sky, open clusters like M11, M35 and the Pleiades are the main deep-sky attractions with this telescope; under a dark sky, fainter nebulae and galaxies shine far better while the strands of dark nebulae and galactic cirrus begin to show up around open clusters.
The brightest planetary nebulae start to resolve with the DX 130 regardless of sky conditions. Most observers won’t see much color in them with this scope’s relatively small aperture — though some people pick out a bluish-green tint in objects like the Ring Nebula and the Cat’s Eye Nebula — but regardless, they’re reasonably easy to see even from light-polluted areas, especially with an aftermarket nebula filter.
Celestron StarSense Explorer DX 130AZ: Functionality
(Image credit: Zane Landers)
StarSense app is optional
Quick and easy setup
Wide field of view forgives manual pointing errors
The StarSense Explorer DX 130 is, by design, a wide-field telescope, and one of its appeals is that you don’t strictly need any computerized pointing aids at all. The nice thing about the StarSense Explorer system is that it’s entirely optional — you can aim the telescope manually, with or without your phone docked, just like any other manual scope.
Set-up is quick: assemble the tripod and mount, attach the tube and an eyepiece, dock your phone, run the app’s alignment routine, and you’re observing. It’s much easier to get started with the StarSense Explorer than with a GoTo telescope, and you aren’t required to use it, either — for a quick gander at the moon or Jupiter for instance, there’s really no need to deal with the phone dock and app. With experience you might find yourself eventually not needing the StarSense Explorer tech at all, especially given the telescope’s wide field of view, which is quite forgiving of any manual pointing errors.
Should you buy the Celestron StarSense Explorer DX 130AZ?
Buy it if:
✅ You need a portable, tripod-mounted wide-field telescope.
✅ You want phone-guided pointing but also the option to aim manually.
✅ You frequently observe from sites with trees or obstructed horizons.
Don't buy it if:
❌ You want the most aperture and stability for your money.
❌ You want motorized pointing and tracking capabilities.
❌ You want to observe close-up details in galaxies and globular star clusters.
On the value for money front, you could get a 6-inch or even an 8-inch Dobsonian for the price of the DX 130 if you’re happy with a fully manual scope, or you could look at one of the other options below. The DX 130 is more portable than a full-size 6- or 8-inch Dobsonian and has a much wider field of view with any given eyepiece — but if you don’t have a fairly dark sky, that advantage is somewhat less valuable compared to those telescopes’ considerably larger aperture, which helps reveal more on targets less affected by light pollution.
A reflector like this gives much better views than the cheap refractors sold at this price and offers a much wider possible field of view than catadioptrics. The StarSense Explorer DX 102, effectively this scope’s sister model, has too much chromatic aberration to deliver sharp high-power images and doesn’t gather as much light as the 130. The StarSense Explorer 5-inch Schmidt-Cassegrain is decent optically and is admittedly a little more forgiving of cheap eyepieces thanks to its longer focal ratio, but it’s no better for planetary work than the DX 130 with proper eyepieces, can’t deliver a wide deep-sky field of view, and gathers slightly less light overall.
Overall, the DX 130 wouldn’t be the author’s top recommendation, but it’s certainly in the top 10 for the price range. If you’ve already decided this is the kind of telescope that you want, it’s a perfectly good choice; just consider the Dobsonians first if you want a manual telescope, or a fully automatic GoTo instrument if you want something more high-tech.
If this product isn't for you
For the budget-conscious
Sky-Watcher Heritage 130P
The Sky-Watcher Heritage 130P uses the same optics as the StarSense DX 130 but is cheaper and more compact thanks to its collapsible tabletop Dobsonian design. The StarSense Explorer 130mm Dobsonian is another option — the same optics again, in a tabletop Dobsonian without the collapsible tube.
For improved performance
Celestron StarSense Explorer 8-inch
A 6-inch f/8 Dobsonian like the Apertura AD6 or Sky-Watcher 6-inch Classic, or even one of the 8-inch models like Celestron’s own StarSense Explorer 8-inch, is much sturdier than the DX 130 or a tabletop scope/tripod, and offers easier collimation as well as higher performance with inexpensive eyepieces. However, they’re quite a bit bulkier and heavier than the DX 130 or a tabletop Dobsonian.
For portability and ease of use
Celestron Astro Fi 130
If you want fully computerized pointing, Celestron’s Astro Fi 130 offers identical specs to the StarSense Explorer DX 130AZ but with full GoTo and tracking operated via your smartphone instead (and can be aimed straight up). However, set-up is much more time-consuming as you can’t simply put the telescope down and go.
The CL Companion is Swarovski's dedicated compact binocular, originally introduced 15 years ago, but has now been redesigned in 2026 to appeal to a wider, younger audience. RSPB research found an increase of around 1,000% in birdwatching among Gen Z in the UK since 2018, with a similar boom now happening in the US.
The CL Companion sits between the pocket-size CL Pocket and full-size EL and NL ranges, making it the perfect mid-range model that combines portability with excellent optical prowess.
The Companion is a grab-and-go, "take it anywhere and everywhere" binocular that is perfect for many different activities, whether that's spotting birds, scoping out your hiking trail or sweeping across the starry sky at night.
We spent a week with both the 8x30 and 10x30 CL Companions to test them out, with the former being ideal for tracking movement with a wider field of view, while the latter brings you closer to the details.
The biggest change in comparison to the old-style CL Companion is in the design. The original version was more of a traditional binocular aesthetic, but this updated design breathes life into the range with three new earth-toned colorways: mountain green, desert orange and safari brown. While some users have said they look somewhat toyish (or just downright ugly), when you handle them in person, they are much more sleek and stylish than the product images would have you believe.
Both the 8x30 and 10x30 weigh just 1.21 pounds (550 grams), so you can easily wear them around your neck all day without even knowing they're there. They're compact enough to put in a large jacket pocket, or you can just wear the included carry bag.
Key specifications
Magnification: 8x / 10x Objective lens diameter: 30mm Weight: 1.21 pounds (550 g) Exit pupil: 3.8mm / 3mm Field of view: 8-degrees / 6.6 degrees Close focusing distance: 9.8 feet (3 m)
The central focus wheel has just the right amount of slip to make it easy to change focus, but is not so loose that you don't have enough control over it. The diopter is located on the front of the focus wheel, which felt a little off at first, but once we set it, there was no danger of accidentally changing it.
They also have generous eye relief, which is great news for users who wear glasses. The eye relief is 19mm on the 8x30 and 18mm on the 10x30. We used them on a bright, sunny day during a heatwave and were easily able to observe while wearing sunglasses with no issues at all.
Swarovski CL Companion: Performance
Swarovski CL Companion 8x30Kimberley LaneSwarovski CL Companion 10x30Kimberley Lane
Sharp optics throughout the image circle
Minimal defects
Excellent for daytime birding
Out in the field, the CL Companions proved to be particularly well suited to daytime birding — although with 90% light transmission, they'll still hold their own at dawn or dusk. Both the 8x30 and 10x30 had a clear, sharp image, with plenty of detail across the image circle. The 8x30 felt particularly easy to use when trying to pick up birds quickly, while the 10x30's extra magnification was great for getting a closer look at more distant subjects.
The color reproduction was natural, and the views had good contrast without looking over-processed. Fine details on feathers were easy to pick out, even on smaller birds. There was a tiny sliver of color fringing towards the edges in high-contrast situations, but it didn't spoil the view whatsoever, and you'd only notice it if you were actively looking for it (which we were). Every time we have used a pair of Swarovski binoculars, there's a three-dimensional viewing experience and depth to the image that you just don't get with cheaper brands.
Both models performed well in the bright daylight conditions we were using them in, both in terms of optical clarity and comfort when using them for longer periods. Their small size and light weight meant we could comfortably track birds in flight without having to take breaks, which is often a dealbreaker when it comes to choosing a pair of birding binoculars.
Swarovski CL Companion: Functionality
Swarovski CL Companion 10x30Kimberley LaneSwarovski CL Companion 8x30Kimberley Lane
Wide field of view for birding
Waterproof down to 13 ft/4 m
3m close focusing distance
The wide field of view is one of the more useful features for birding. The 8x30 has a 549 ft (140m) FOV, while the 10x30 has 377 ft (115m) — both of which are wider than the original generation of CL Companion. Both made it easy to find birds when scanning trees and bushes, and there was enough space around the subject to follow them easily after they took flight.
The close focusing distance of 9.8 feet (3m) was also handy when birds came closer, and enables you to observe insects like bees and butterflies without spooking them by getting too close. And with the smooth focus wheel, it was easy to change focus between the two distances.
Both models are waterproof down to 13 feet (4 m), which is likely more protection than most people will need, but it is reassuring when using them outdoors in the rain, or if you were to accidentally drop them in a puddle.
Should you buy the Swarovski CL Companion?
On paper, they tick all the boxes. The optics are excellent, and they're lightweight and easy to carry. But with Swarovski being very upfront about the fact that it’s going after a younger audience with these CL Companions, we have to wonder what young person would have a spare $1,500 to spend on a pair of binoculars? It's not a small investment, so you'd need to be a dedicated observer to spend that kind of money.
That said, they're much more than your typical compact binoculars. They're a genuinely impressive binocular with stunning optics built into a small and compact package. Typically you need to compromise on one or the other, but the CL Companion gives you the best of both worlds.
If this product isn't for you
Something more premium
Swarovski NL Pure 8x42
Dedicated birders who want a more premium option will want to look at the Swarovski NL Pure range. They're one of the best binoculars we've ever used, and you'd never have to buy another pair again. We tested the 8x32, but if you like to observe at dawn or dusk, the 8x42 would be ideal.
The Hawke Endurance ED 8x25 are tiny, pocket-sized compact binoculars with genuinely impressive optics. Our optics writer loved testing them so much she went out and bought herself a pair.
Dedicated stargazing needs a bigger objective lens diameter — we love the Celestron SkyMaster Pro 20x80, although you'll need to mount them on a tripod.
The Canon RF 20mm f/1.4L VCM is an intriguing lens for photographers who want a wide field of view without sacrificing aperture. Its f/1.4 maximum aperture makes it particularly appealing for astrophotography, while the 20mm focal length offers plenty of room for landscapes, architecture and other wide-view scenes.
We took the lens out to the dark skies of Wales to photograph the night sky and the Perseids, giving it a real-world test in some of the best conditions we could find.
With a premium L-series build and a price tag to match, there's a lot to consider before adding this lens to your kit. We wanted to find out how it actually performs in the real world, and whether it's worth the investment.
Canon RF 20mm f/1.4L VCM: Design
It's a nice size and weight, despite not being the smallest lens. (Image credit: Kimberley Lane)
Premium, solid build
Surprisingly manageable for an f/1.4 lens
A few small quirks keep it from being flawless
The Canon RF 20mm f/1.4L VCM feels like a proper L-series lens from the moment you pick it up. It's solid and reassuringly well-built, but it never felt excessively heavy or awkward on the camera. At 1.41 pounds (519 grams), it's certainly not a tiny 20mm prime, but the weight is well balanced and it was comfortable to carry and shoot with. And considering it'll often be used for astrophotography, it'll be on a tripod a lot of the time anyway.
The focus and control rings both feel smooth and nicely weighted, while the switches and customizable buttons are easy to find without having to look at the lens. The weather-resistant build is another bonus for outdoor shooting, which will come in handy if you also use the lens for landscapes where you might encounter inclement weather.
The dedicated aperture ring is also a nice feature, especially if you prefer having more physical controls rather than relying on the camera body and remembering which dial is set to each setting. Plus, the clickable nature of the aperture ring is an ASMR dream.
Canon RF 20mm f/1.4L VCM: Performance
The wide 20mm focal length and fast f/1.4 aperture are perfect for astrophotography. (Image credit: Kimberley Lane)
Excellent low-light performance
Sharp in the center with some corner softness
f/1.4 makes a real difference under dark skies
A fast 20mm is a pretty exciting combination for astrophotography. It gives us plenty of sky to play with, while the f/1.4 aperture pulls in a lot of light. Under those dark skies, the Milky Way came through beautifully, with plenty of detail without needing to resort to boosting the ISO too high.
We took the lens out to Carmarthenshire in Wales under Bortle 3 skies to photograph the night sky during the peak of the Perseids, which also coincided with the new moon — the perfect recipe for astrophotography.
The center of the frame is where this lens is at its best. Stars are crisp and well-defined, which is exactly what we want from a lens that is being used for astrophotography. The edges aren't quite as impressive, though. There is some softness and a little stretching of the stars towards the outer parts of the frame, particularly when the lens is wide open. It's not enough to ruin an image, but it becomes obvious when zooming in and pixel-peeping at the corners.
Canon RF 20mm f/1.4L VCM: Functionality
It's a very practical choice for everyday shooting.Kimberley LaneKimberley Lane
Quick and reliable autofocus performance
Customizable controls are genuinely useful
A practical choice for everyday shooting
The Canon RF 20mm f/1.4L VCM is very straightforward to use out in the field — especially in the dark. The autofocus was quick and reliable during testing, and for everyday shooting of landscapes, or even for video, this means there's very little to think about.
The customizable controls are useful, too. The lens function button and control ring can be assigned to different settings, allowing you to put the controls you use most within easy reach. It's a small thing, but being able to set the lens up around your personal shooting style makes it feel more intuitive and can save a surprising amount of time.
Key specifications:
Focal length: 20mm Aperture: Constant f/1.4 Weight: 1.14 pounds (519 g) Dimensions: 3 x 3.9 inches (76.5 x 99.3 mm) Filter thread: 67 mm
The 67mm filter thread is another practical advantage, as it's a common filter size, so you won't necessarily need to invest in an entirely new set of filters if you already own that size.
The lens doesn't feature a ton of bells and whistles, but that's not a bad thing. It's designed to be picked up and used without much fuss, and after spending time with it, we found that its simplicity is one of its strengths.
Should you buy the Canon RF 20mm f/1.4L VCM?
The Canon RF 20mm f/1.4L VCM lens makes the most sense for photographers who regularly work in low light or want a dedicated wide-angle prime. Astrophotographers are likely to get the most from it, but it also has plenty to offer for landscapes, architecture, interiors and environmental photography.
Its biggest appeal over a zoom is its f/1.4 aperture. If you already have a wide-angle zoom but regularly find yourself having to bump up your ISO in low light, this lens fills that gap while also offering the control of a fast prime.
However, it's a fairly specialist addition to a lens lineup, and the price makes it tricky to justify if you only occasionally shoot wide. If you need the flexibility of changing focal lengths, or if you primarily shoot distant subjects, you'd be served better by a zoom or longer lens
If this lens isn't for you
Cheaper option
Canon RF 16mm f/2.8 STM
The Canon RF 16mm f/2.8 STM is a much more affordable way into Canon's full-frame RF wide angle range, and it's much smaller and lighter. It lacks the 20mm f/1.4L's fast aperture, L-series glass and premium build, but if you're just starting out, or you only occasionally shoot wide, it could be a better option.
If you want to shoot wider
Canon RF 14mm f/1.4L VCM
If 20mm isn't wide enough, the Canon RF 14mm f/1.4L VCM gives a noticeably more expansive view while keeping the same fast f/1.4 aperture. It's a slightly more specialist choice for dedicated astrophotographers who want to capture as much sky or landscape as possible.
If you want more versatility
Canon RF 15-35mm F2.8L IS USM
If you don't want to be stuck with one focal length, the Canon 15-35mm f/2.8L IS USM is the obvious choice for astrophotographers. The focal range covers a much wider variety of photography styles, making it more practical for everyday shooting.
The ZWO Seestar S50 Pro was released on Aug. 25, 2026. It's a smart telescope that ships with everything you need to get started with astronomy and solar observations, eliminating the need to buy any other accessories.
It is controlled through the Seestar app on a smartphone and offers automatic slewing and autofocused views of galaxies, nebulas, star clusters and more. That said, in our experience, it sometimes needs manual adjustment with the on-screen joystick to perfect centering.
This being the Pro version of the original S50, which released three years prior, it's more expensive; you'll be paying $450 more than the original S50, with the S50 Pro coming in at $999. For that you get double the storage capacity (128 GB instead of 64 GB) and a higher resolution (4K not Full HD). ZWO claims the Pro has an extended battery life of nine hours, though we can't test this yet because the app version responsible for this uplift from the originally stated seven hours (version 3.3.1) wasn't released during testing.
So are these upgrades enough to warrant the extra spend?
ZWO Seestar S50 Pro review
ZWO Seestar S50 Pro: Design
The Seestar S50 Pro comes in white with a compact mini carbon fiber tripod.Jase Parnell-BrookesOnly two buttons feature on the telescope itself, a large power button and a smaller reset button underneath.Jase Parnell-BrookesA dual lens system mirrors the S30 Pro's design and even has the same resolution.Jase Parnell-Brookes
Lightweight and easy to carry in the case provided
Dual-lens system mirrors the S30 Pro
Simple, two-button design and an easy push-on solar filter
The Seestar S50 Pro is instantly recognizable as a smart telescope. A neat, rounded and glossy plastic casing protects the fragile but automatic optical and electrical insides that power this pocket rocket. Only two buttons are found on the entire device: a large power button on the side enveloped by a ring of light that glows when powered on, and a small reset button on the bottom of the telescope.
Specifications
Image resolution: 8.3 MP (3840 x 2160) Aperture: 50mm (1.96 inches) Focal length: 260 mm Storage: 128 GB internal Field of view: 2.8 degrees (tele) / 63 degrees (wide) Mount: Motorized alt-azimuth (EQ mode supported) Battery: 9 hours (currently untested) Weight: 6 pounds (2.72 kg)
The carry case that the S50 Pro ships in looks like black compressed polystyrene but has neat latches and a red handle that tucks away in a slot at the top, making it easy to pack — similar to a drone case. This is much better than some of the bags you can buy for smart telescopes as it feels more rigid and secure. The S50 Pro and its tripod and solar filter all ship together and are snugly held inside.
Everything feels more polished and refined in the design of the S50 Pro, compared with the S30 Pro.Jase Parnell-BrookesThe carry case is cleverly designed and feels very protective with snug fit of the telescope and accessories inside.Jase Parnell-BrookesBuilt into the case are two latches and a red handle that pushes into a groove to facilitate compact stowing.Jase Parnell-Brookes
It's light, too. We weighed it all, and the whole setup weighs 8.6 pounds (3.9 kilograms) fully packed, 6 pounds (2.7 kg) of that being the S50 Pro itself. It's also small; we measured it at 5.7 x 10.6 x 5.4 inches (146 x 270 x 138 mm), including the rubber feet on the bottom. Incidentally, we like that because it means you don't have to use the tripod if you don't want to.
We even received a bunch of ZWO-branded stickers that, if we were so inclined, we could pop on the telescope. But we're probably going to give them to the nephews.
A 3/8-inch tripod thread on the bottom fits most photographic tripods, but a small carbon fiber tripod ships with it.Jase Parnell-BrookesThe carbon fiber tripod is light and locks in place with metal twist locks.Jase Parnell-BrookesRubber feet reduce vibrational interference and grip smooth, uneven surfaces without trouble.Jase Parnell-Brookes
Everything is controlled via the Seestar app, the same as all the other ZWO Seestar telescopes. This is typical for smart telescopes, which are almost always operated via an app.
As usual, and as we said in our S30 Pro review, it has a 3/8-inch tripod thread underneath, but the tripod itself is very small. We ended up using a larger photographic Gitzo carbon fiber tripod without the tripod head. But beware — if you're going to do this, take the tripod head off first. It won't fit the 1/4-inch thread of your standard mirrorless camera, which is likely what your tripod footplate will be.
ZWO Seestar S50 Pro: Performance
Aligns and tracks automatically
Live stacking reveals faint objects quickly
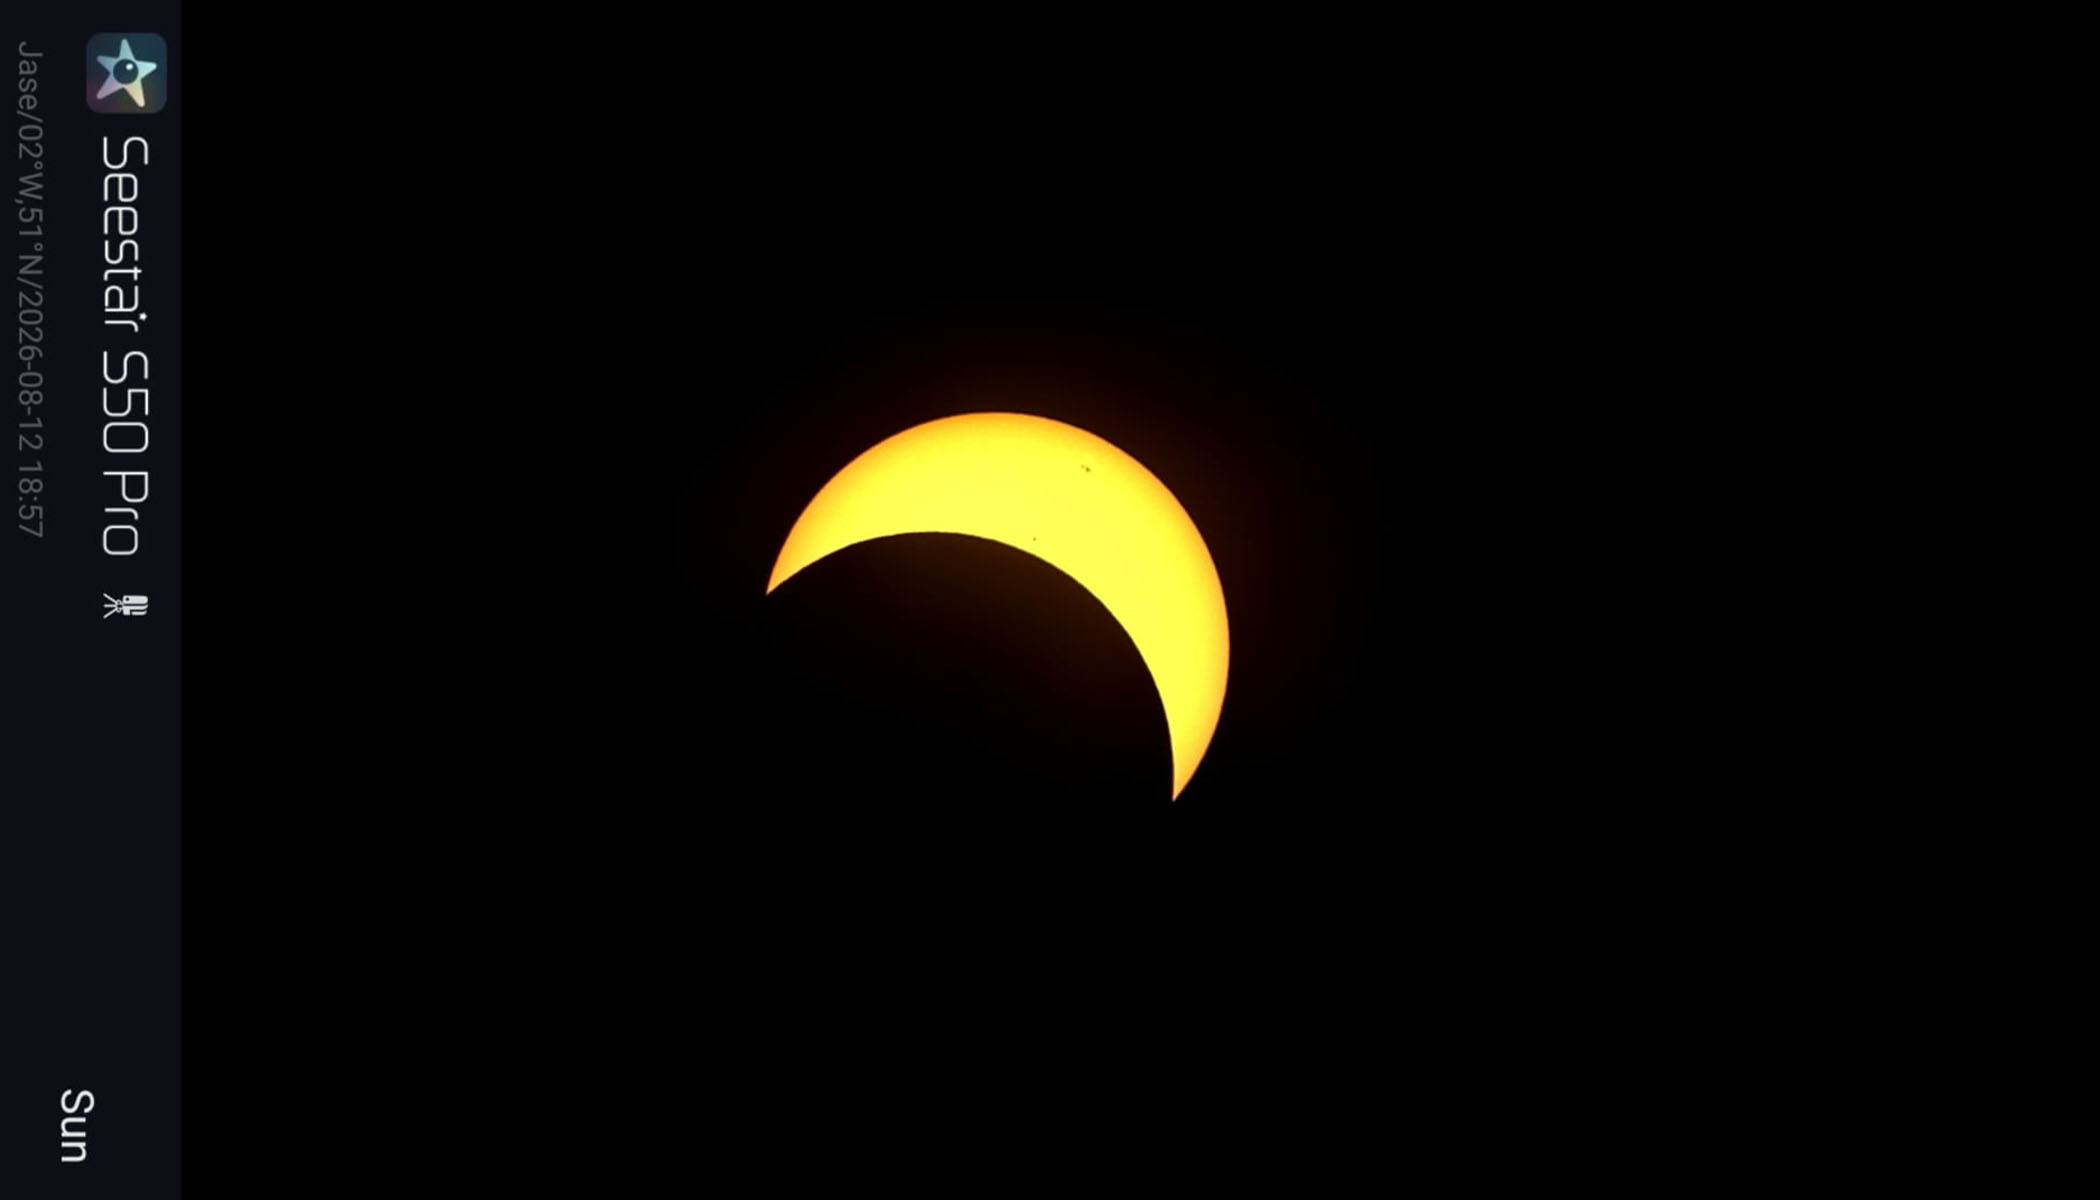
Solar eclipses can be shot as photo or video timelapses
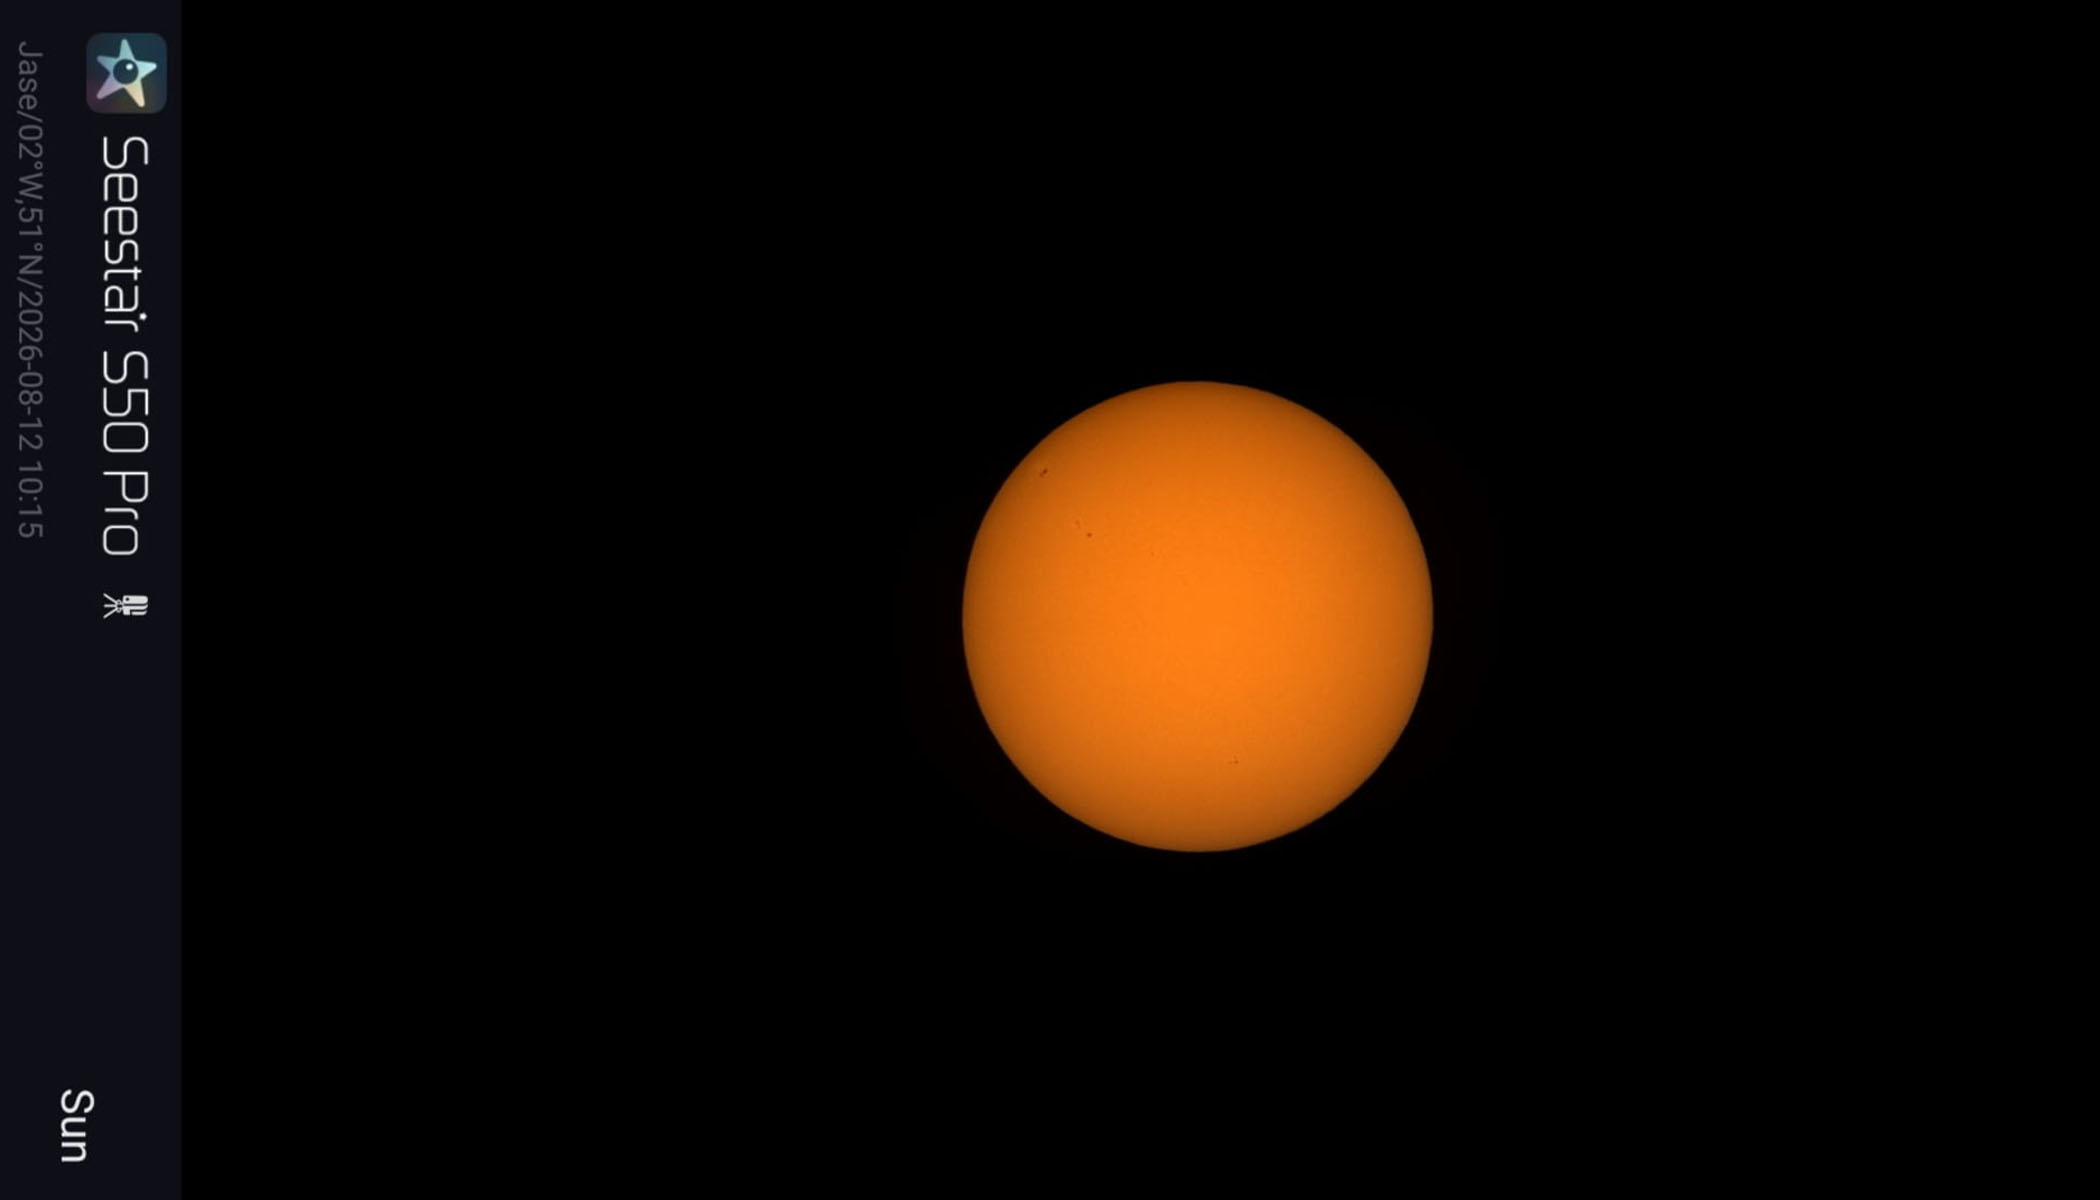
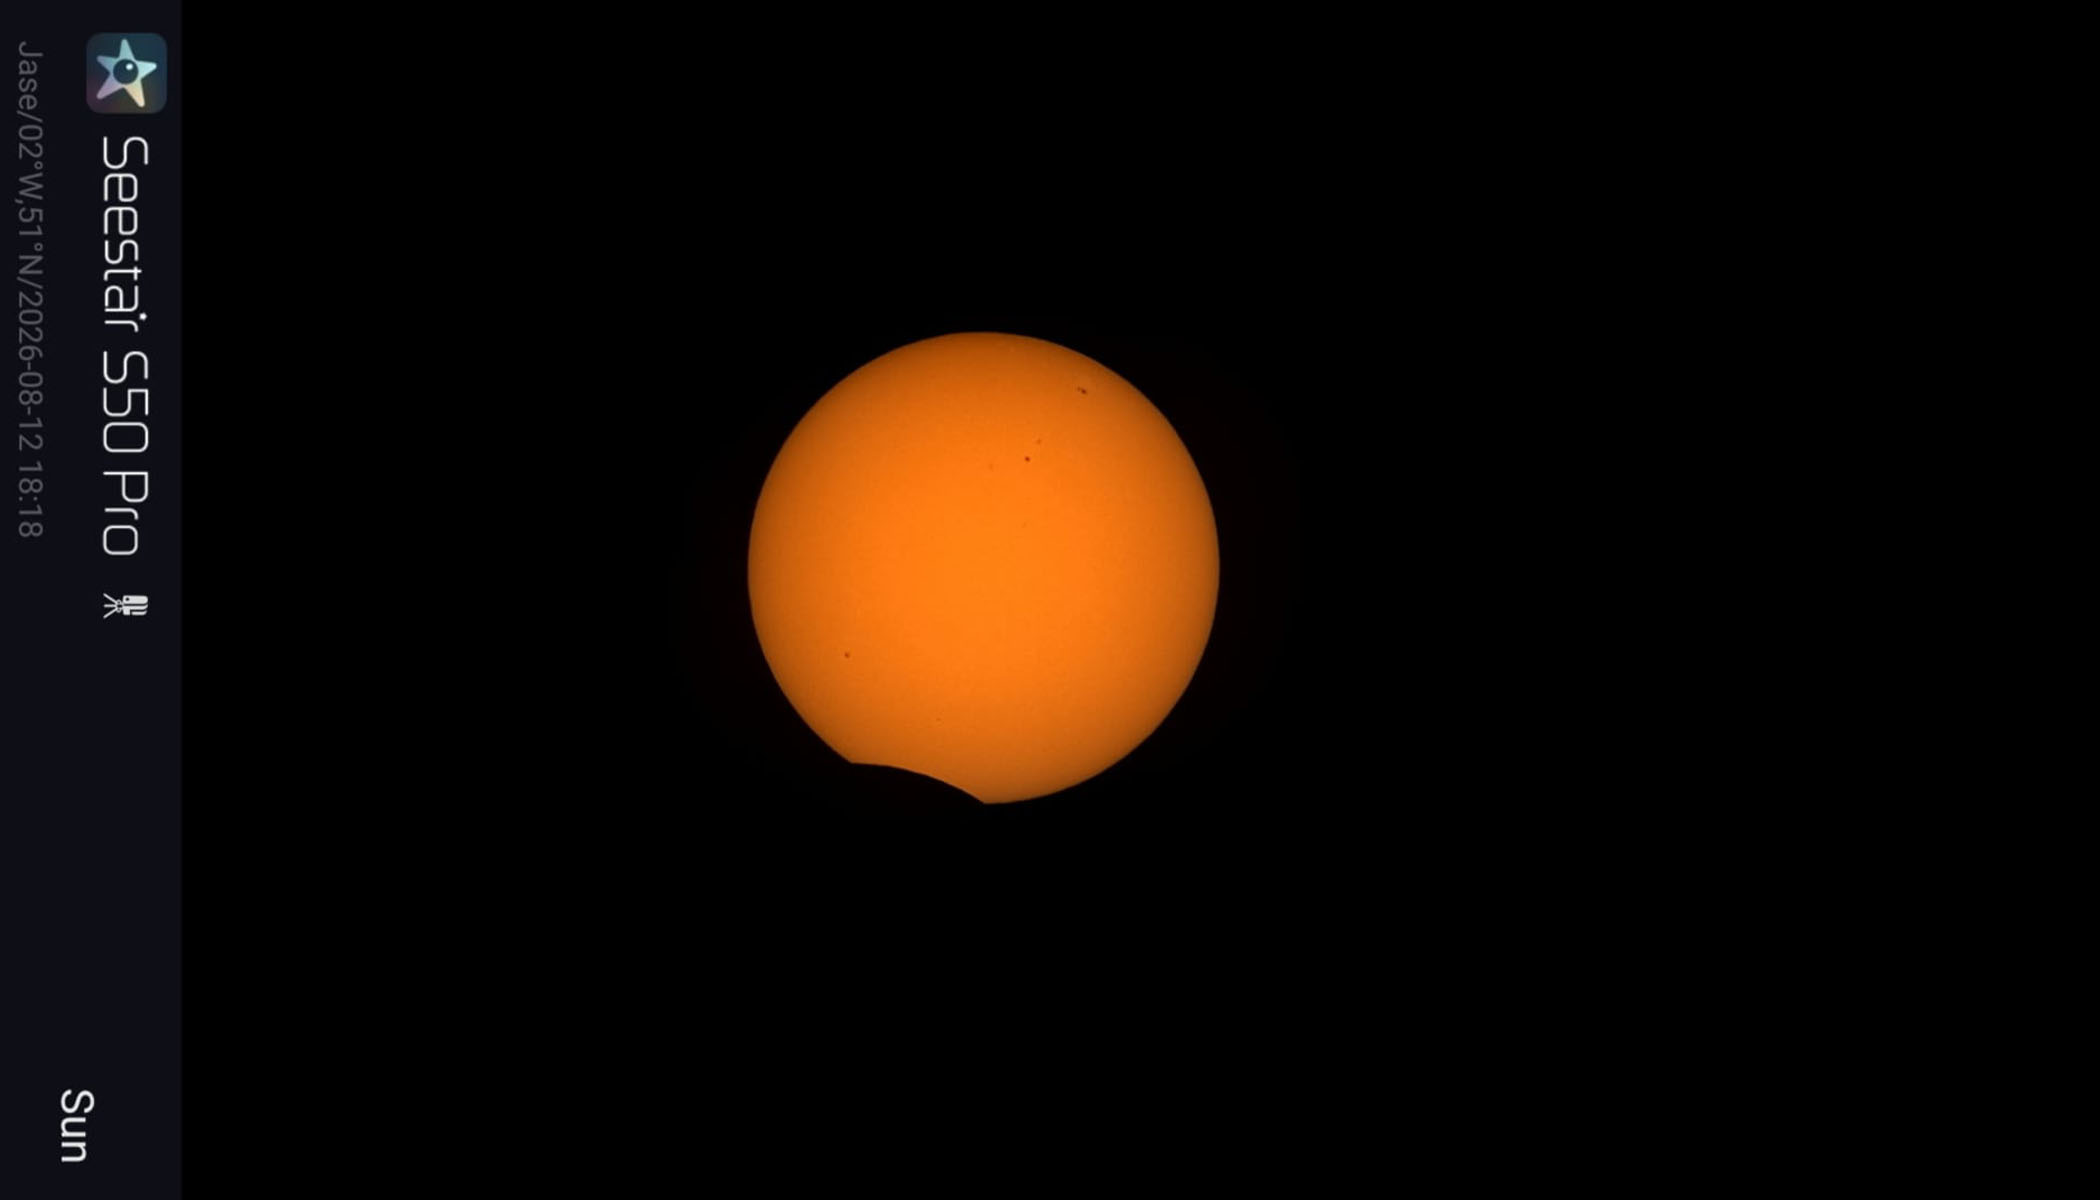
Sunspots can be seen on the photosphere of the sun, and the push-on solar filter that ships with the telescope gives it a warm, orange hue. (Image credit: Jase Parnell-Brookes)
It took a matter of minutes for the live-stacking feature to give us clear and bright views of any object we slewed to. Live-stacking enables the smart telescope to take image after image to produce more detailed results of dim deep sky objects.
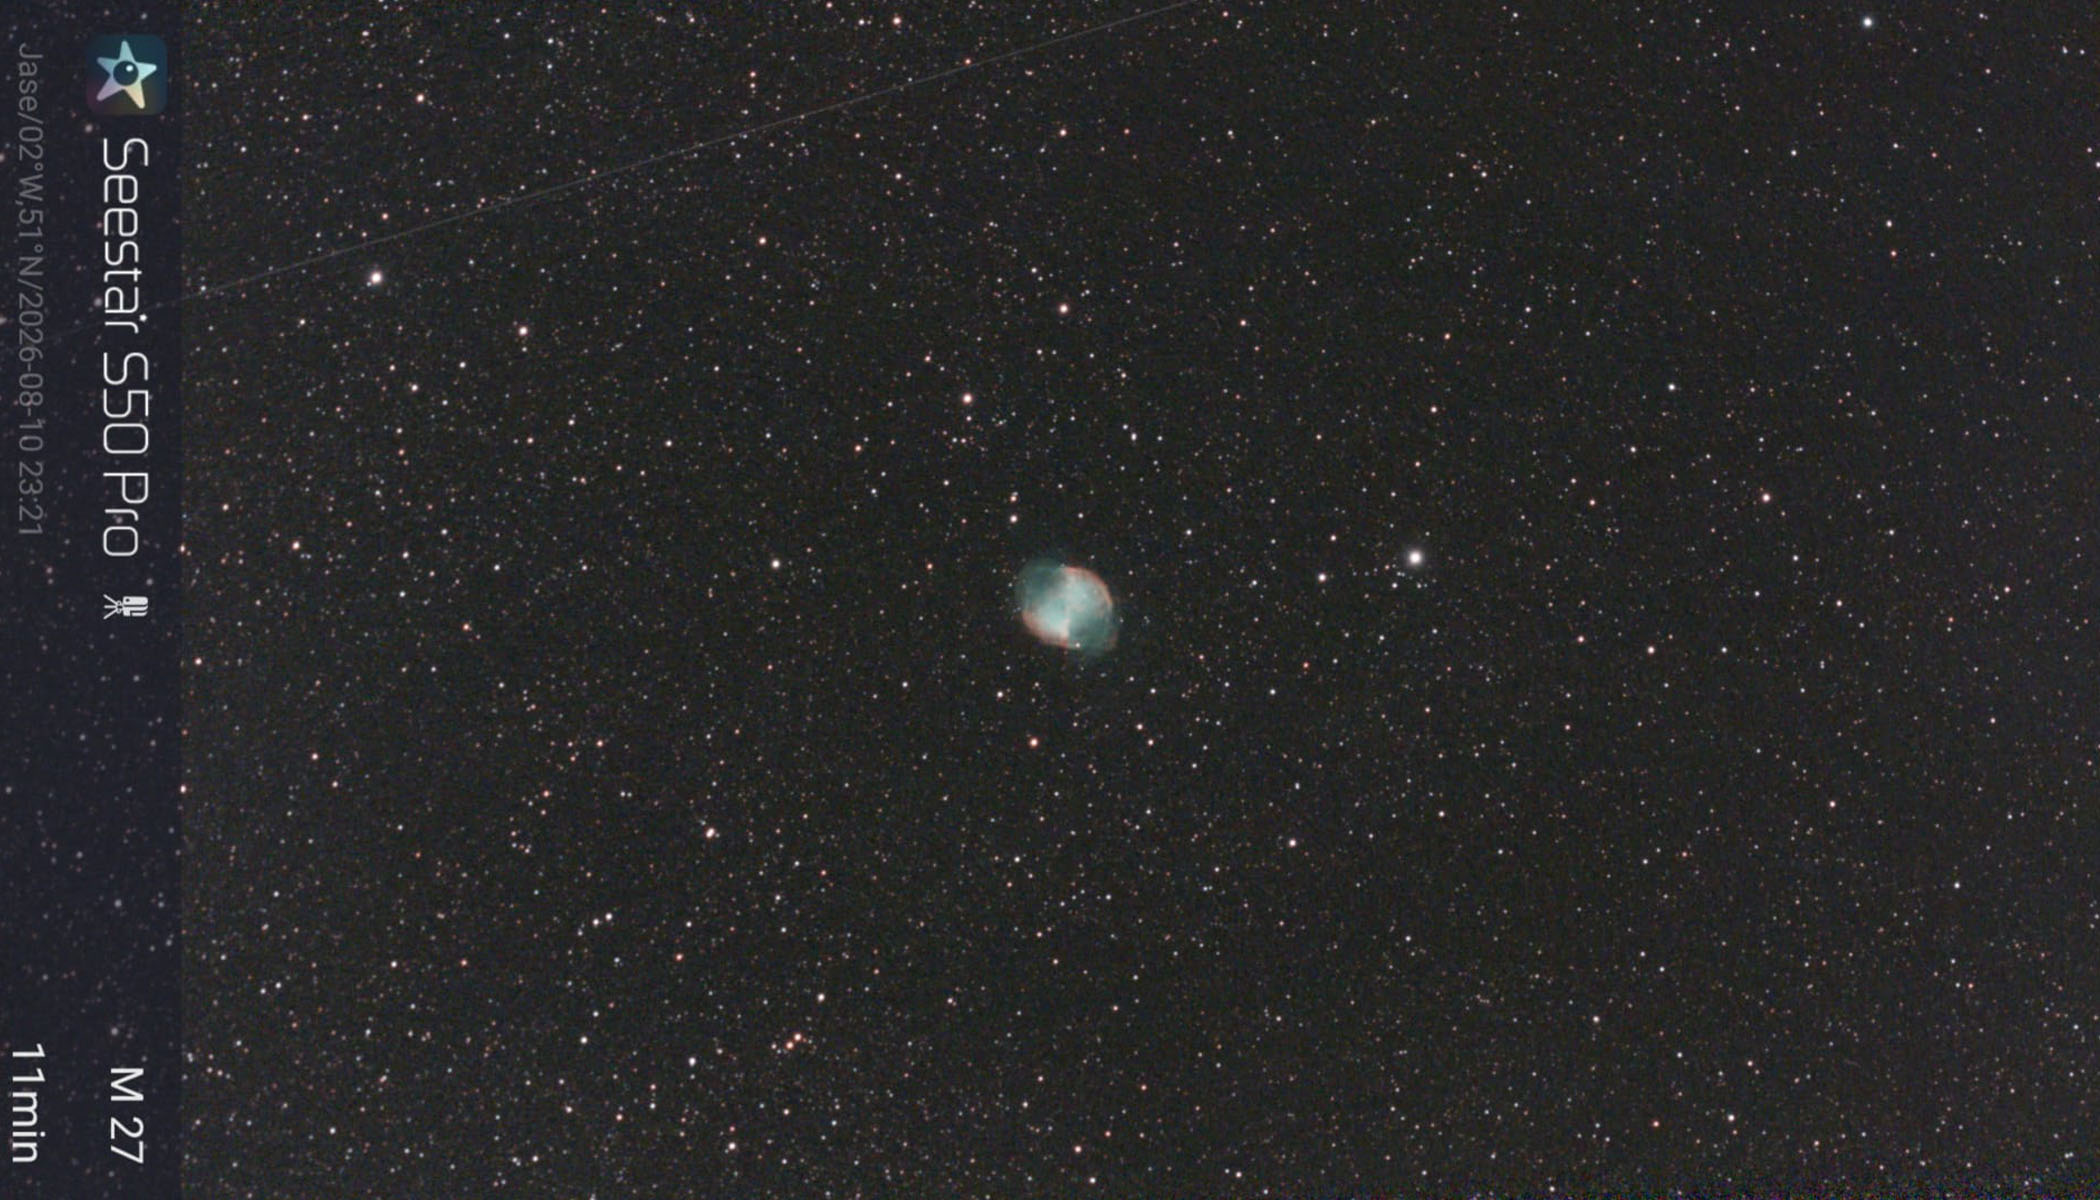
M27, the Dumbbell Nebula, was our standout favorite during testing, which we imaged over 10 minutes and 20 seconds. The final image captured the vibrant greenish blue core shining through, sandwiched by the red and orange glow of the nitrogen, hydrogen-alpha and sulfur.
Color and detail are impressive on the Dumbbell Nebula, but we wish it was larger in the frame. (Image credit: Jase Parnell-Brookes)
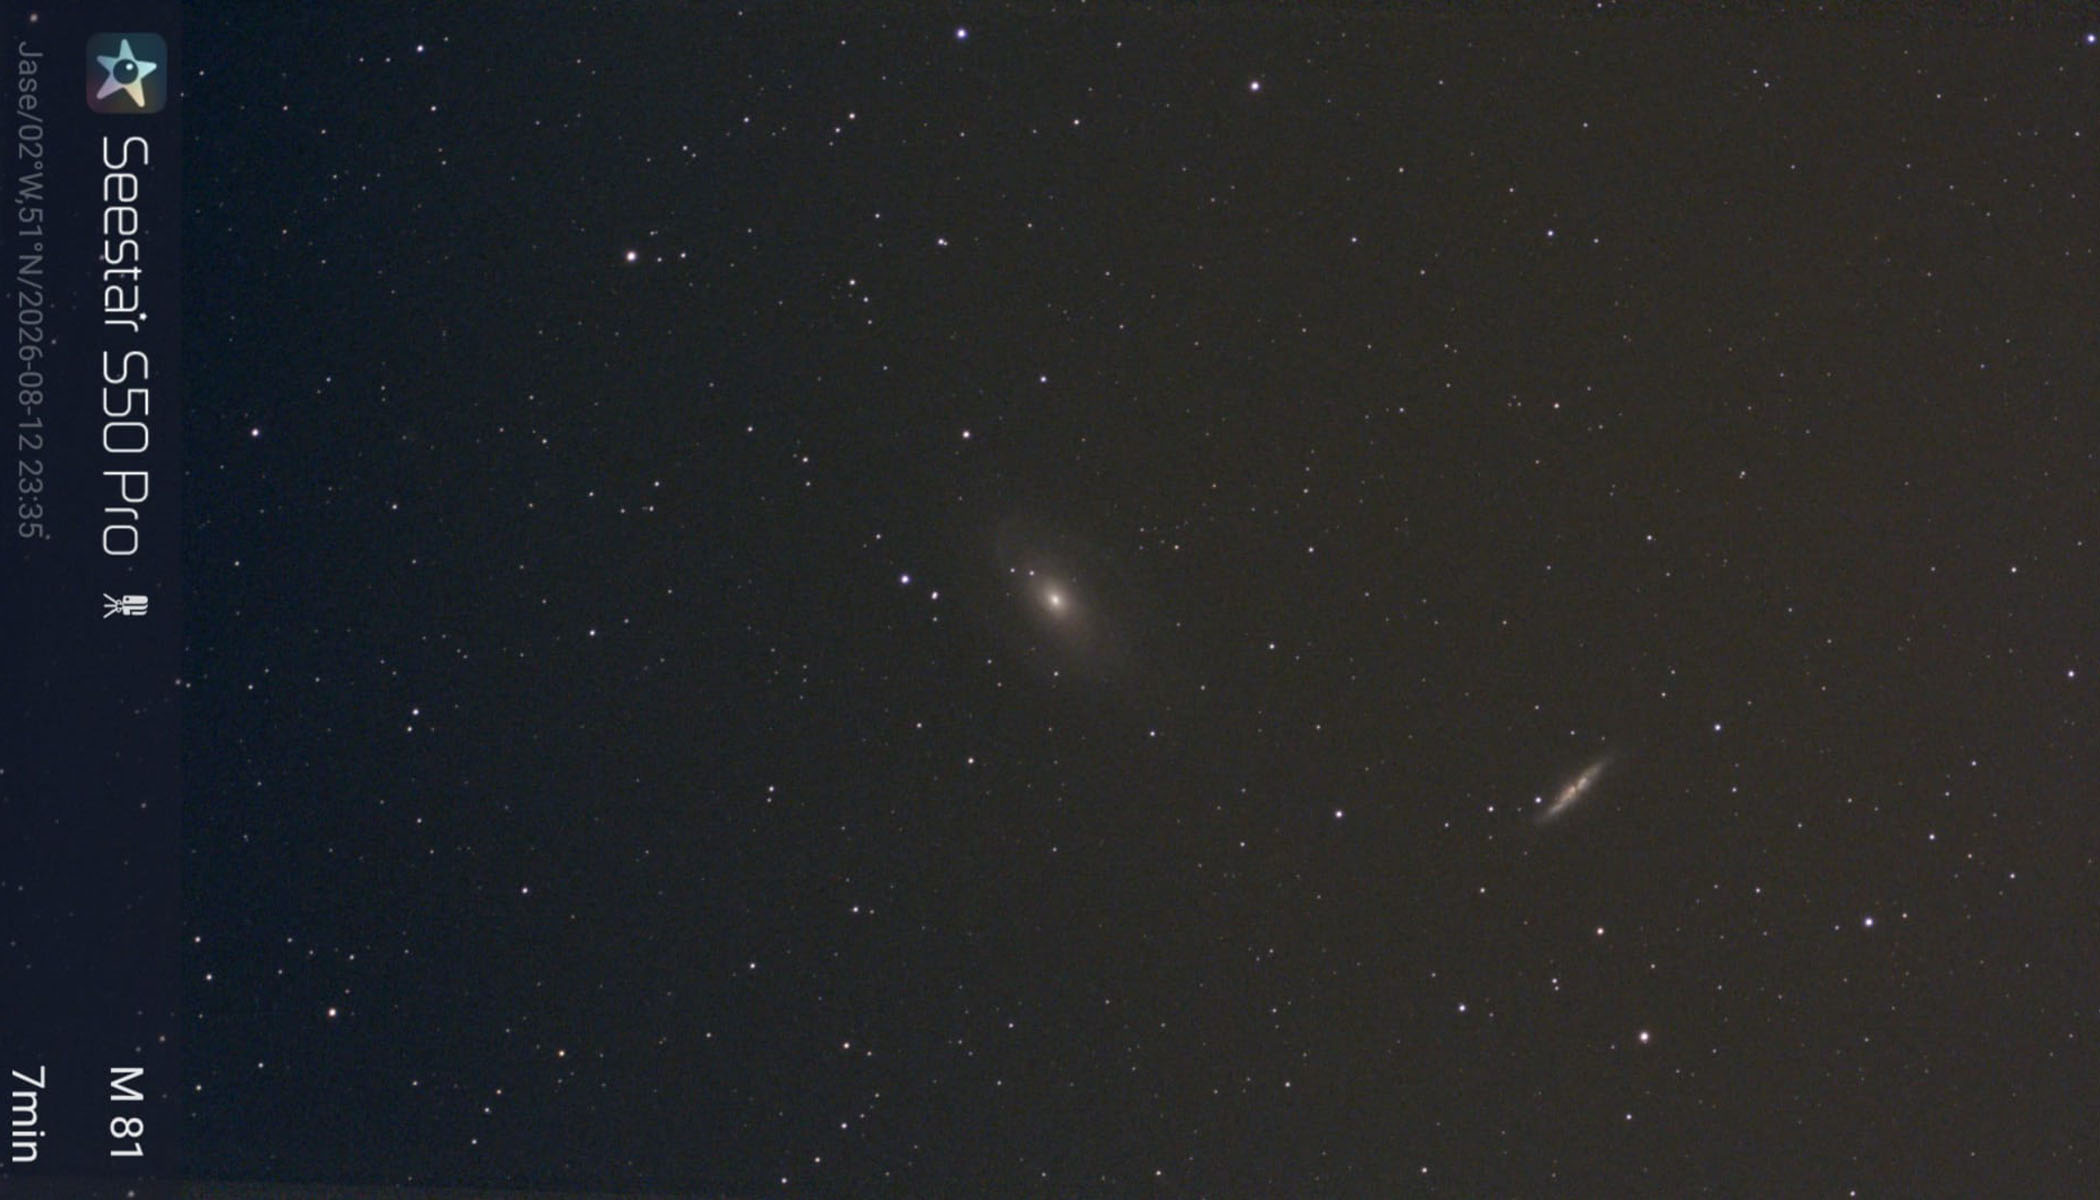
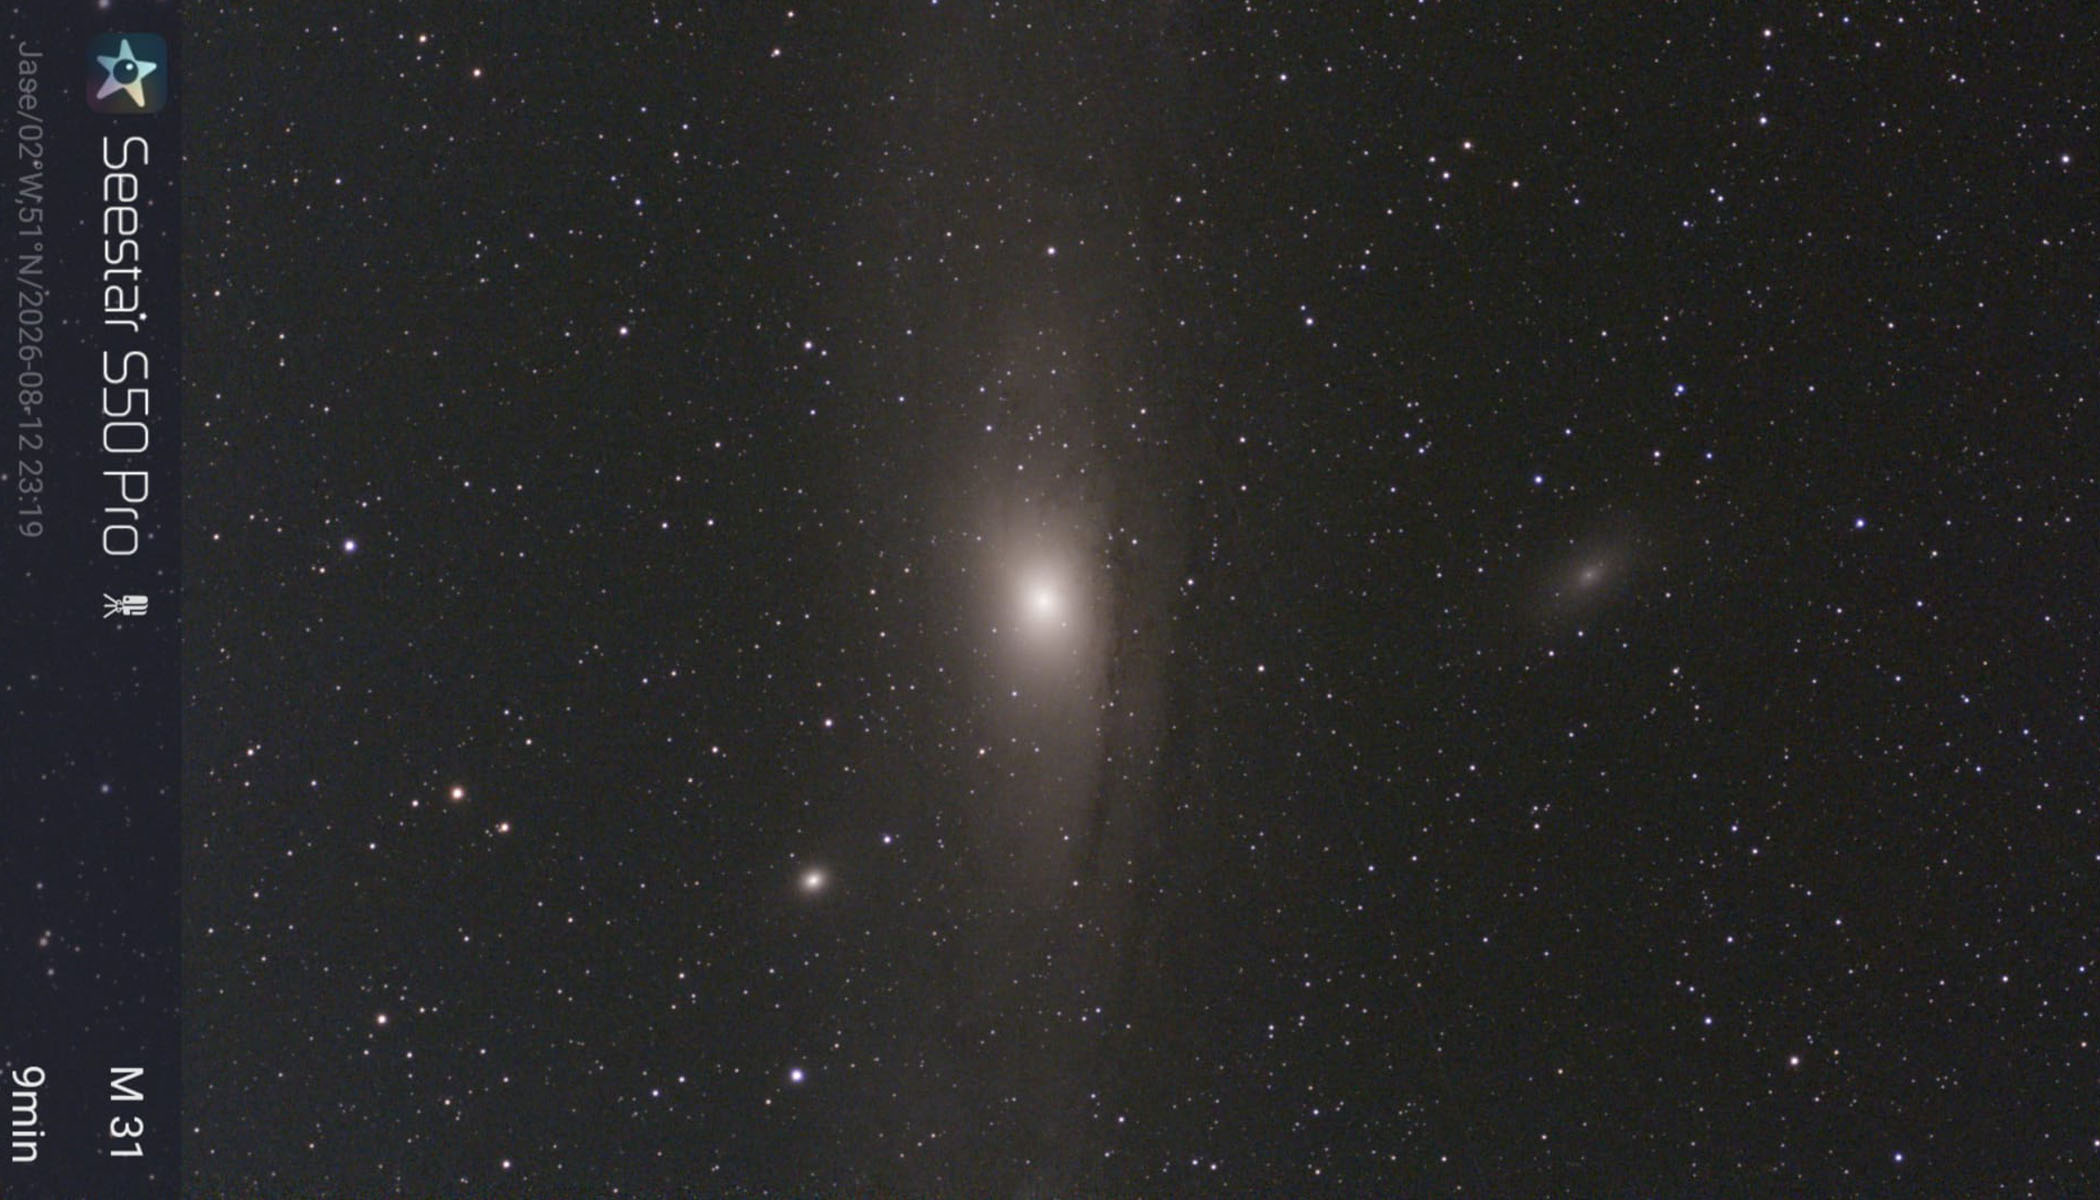
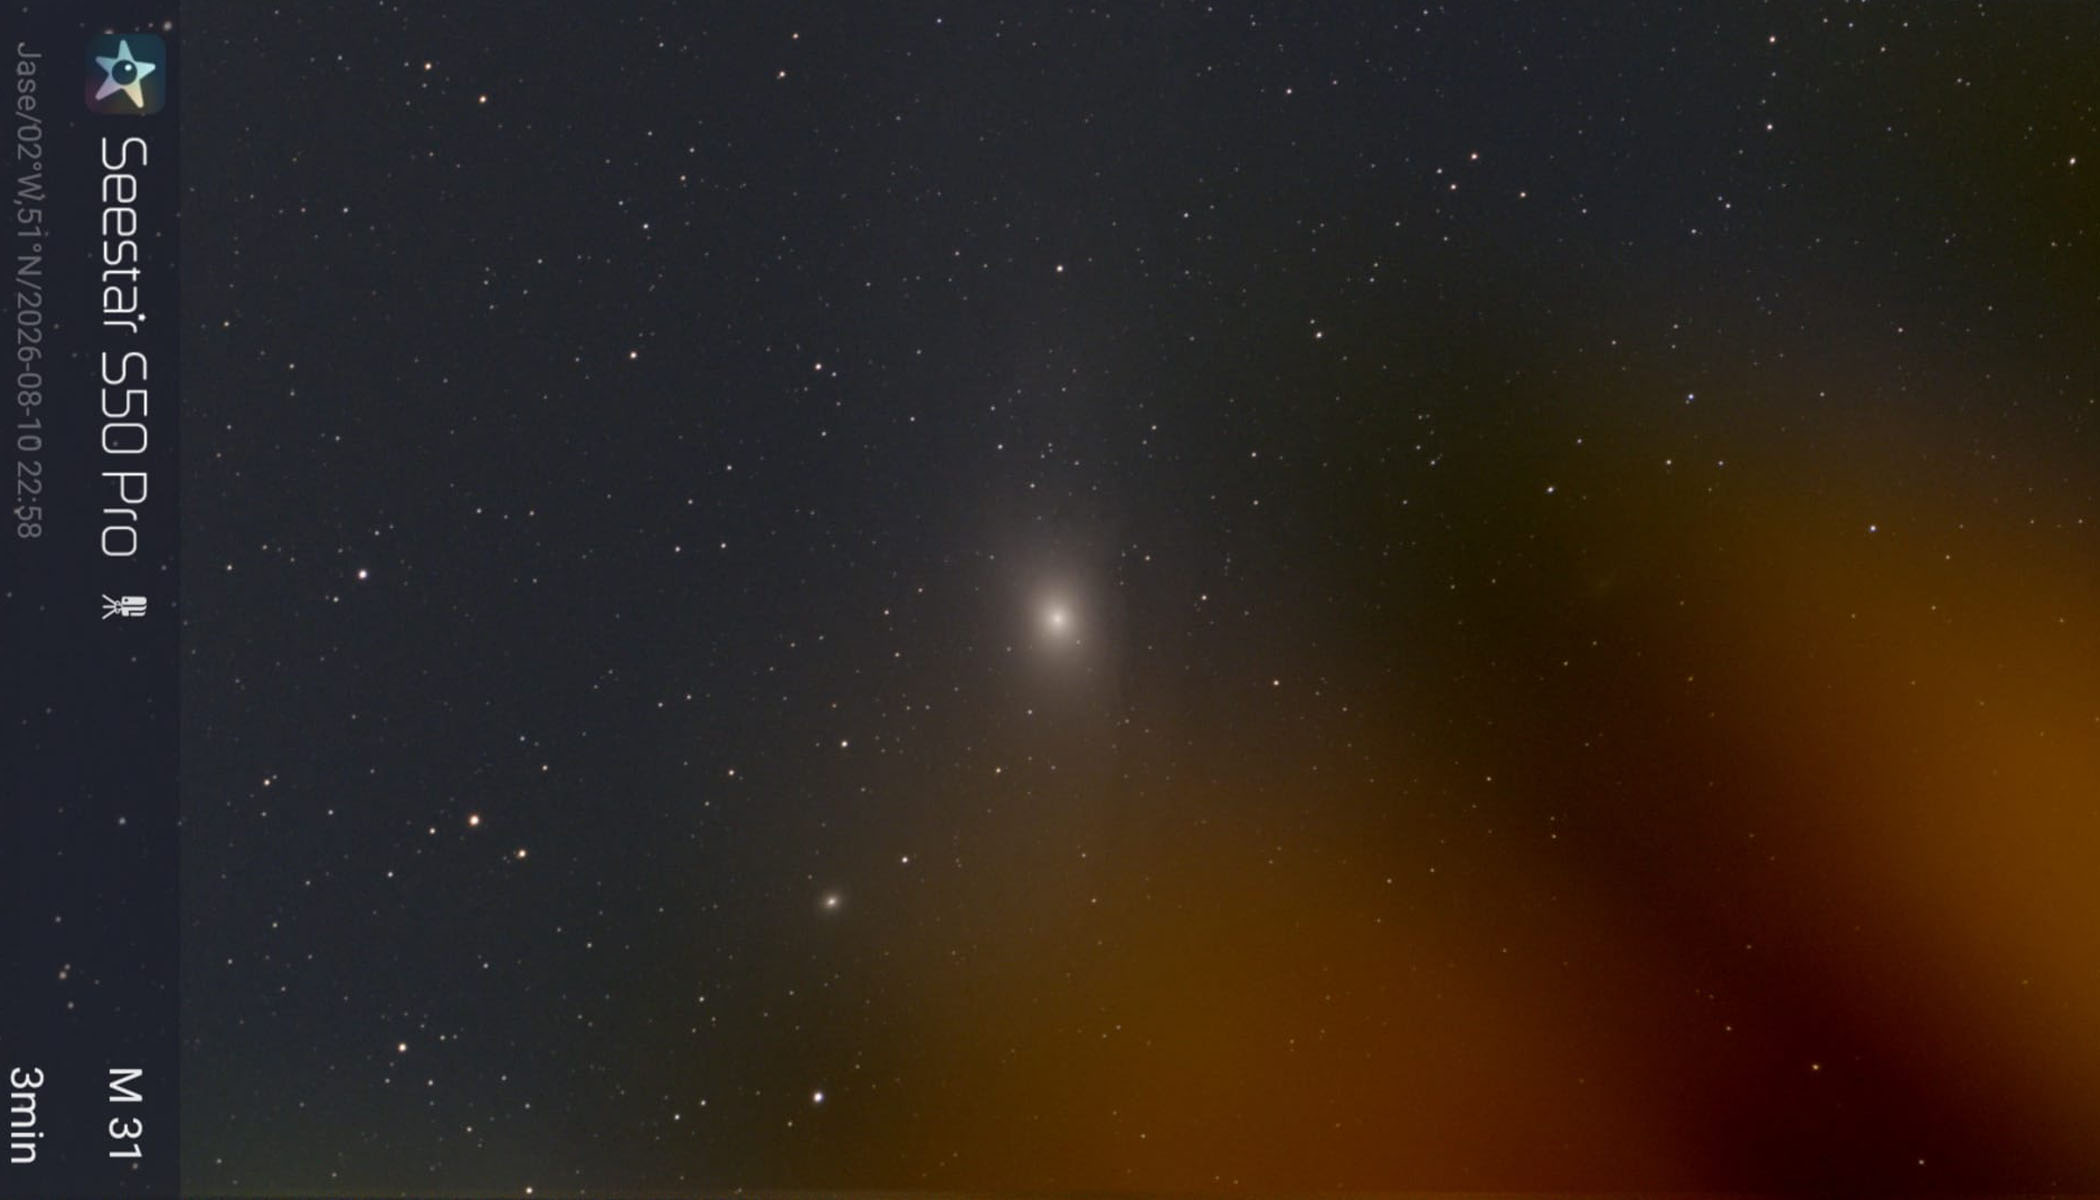
Other notable objects we observed included M31 (the Andromeda Galaxy), which had good shape and reasonable clarity over the nine-minute exposure and filled the frame nicely considering this is an 8.3 MP image. It's also possible to image M81 (Bode's Galaxy) and M82 (the Cigar Galaxy) together on the S50 Pro due to the wider field of view, and after only 6 minutes and 30 seconds' exposure time we saw clear arms on M81 and fragmented detail and deep coloring in M82 which we were pleased with.
Some spirals seen in M81 and detail seen in M82 in this seven-minute exposure. (Image credit: Jase Parnell-Brookes)
The Andromeda Galaxy really fills the frame when observing with the S50 Pro. (Image credit: Jase Parnell-Brookes)
We also observed the sun, both before, during and after the Aug. 12, 2026 solar eclipse. Sunspots were clearly visible on the S50 Pro, and the solar filter that ships with the S50 Pro as standard gives it a warm orange tone, which is pleasing, even if we couldn't see much other detail like granules or faculae. However, we wouldn't expect that with a smart telescope of this spec at this price point.
The start of the Aug. 12, 2026 solar eclipse was promising with crisp edges, sunspots and a warm orange tone with well-balanced exposure. (Image credit: Jase Parnell-Brookes)
Something that did frustrate us, though, was the S50 Pro's automatic exposure metering. This became most apparent during the Aug. 12, solar eclipse when taking a timelapse video.
The sun was overexposed most of the time, only allowing the darkest of sunspots to appear on the surface, but as the moon moved in front of the sun the exposure kept changing up and down, which it also did when clouds moved in front. The resulting timelapse was fun to share with friends and family over instant messaging but was far from ideal.
During the solar eclipse on Aug. 12, 2026 the metering of the telescope skewed and we were left with an overexposed sun. (Image credit: Jase Parnell-Brookes)
We also urge you to use a taller photographic tripod or similar when observing, due to our first session of nighttime imaging being obscured by a nearby tree bending into view during a long exposure, thanks to an occasional gust of wind.
Due to the tripod being so short, sometimes trees bend into view with gusts of wind. Frustrating for long exposures. (Image credit: Jase Parnell-Brookes)
ZWO Seestar S50 Pro: Functionality
The solar filter pushes on to the front of the lens assembly.Jase Parnell-BrookesThe telescope as viewed without solar filtration.Jase Parnell-Brookes
Smartphone app is easy to use
A few niggles irk us, like typos and mislabelling
Zero-backlash motor purportedly reduces wind interference
Setting up the Seestar S50 Pro is easy, and if we hadn't run into some synchronization issues with the app, or if we had used the NFC (near-field communication) feature, it could have been up and running in around five minutes.
Things being as they were, though, we had to restart and reinstall the app once or twice, with the telescope not visible to connect with in the app. It took around 30 minutes total, which is no big deal for a first-time setup, but it's something to consider.
There were a few niggles that struck us as odd, considering ZWO's outstanding ability to produce high-end astronomy products. Namely, we experienced the Seestar S50 Pro naming the sun as the moon (it was a few hours before the solar eclipse and it's possible it got visually confused because of the solar filter). There was also a typo when checking if the sun is "in the fram."
Plus, when observing long exposures, ZWO's Seestar mascot clung to the side of the screen and couldn't be removed. These are nothing super major but are all things we would like to see addressed before spending $999.
A few quirks of the Seestar app have us wondering if this has been given a final once-over. (Image credit: Jase Parnell-Brookes)
Everything about the S50 Pro's functions is almost identical to the S30 Pro, which we reviewed in April 2026. Live-stacking of 10-second exposures reduces the signal-to-noise ratio and improves details over time. It automatically slews to and autofocuses on subjects. The S50 Pro also has plate-solving in order to orient itself on the stars of the night sky as most smart telescopes do. It has an equatorial mode for better subject tracking, and it's operated by the same Seestar app.
One big difference, however, is the S50 Pro's zero-backlash motor, which is used for tracking subjects. Compared with the S30 Pro's stepper motor, which is internally geared, the S50 Pro has more precise tracking and better resistance to wind movement. We saw clear and sharp images produced during testing, but there was minimal wind on the nights we tested, so further observations are required to confirm how much of a difference this really makes to the average user.
The telescope fits snugly into the compact carry case. (Image credit: Jase Parnell-Brookes)
Should you buy the ZWO Seestar S50 Pro?
Buy it if:
✅ You need the extra light-gathering of the 50mm aperture
✅ You want a compact smart telescope that comes with a protective carry case and accessories
✅ You don't mind dropping nearly $1,000 on one device
Don't buy it if:
❌ You need something smaller and lighter
❌ Traditional observation is more appealing
❌ You want a budget smart telescope
If you don't have a smart telescope already and haven't tried any other ZWO smart telescopes, the S50 Pro is an easy win. It sits at the top of ZWO's smart telescope range, has the joint-largest aperture they offer, the joint-highest resolution and ships with everything you need to get started, even a solar filter for daytime observing. It's the best ZWO smart telescope currently available.
However, unless you have nearly $1,000 to spend on an instrument such as this, there are cheaper alternatives that do almost as well at a much lower price point. ZWO's own S30 Pro is $300 cheaper and bags a large amount of the same features and specifications as the S50 Pro. At nearly half the price, the S50 gives you the same aperture, but you will be restricted to much lower resolution.
If this product isn't for you
If you want something cheaper
ZWO Seestar S30 Pro
Save $300 and grab the S30 Pro for the same resolution and most of the features but with a smaller 30mm aperture. You probably won't notice much difference between the two if you're an occasional backyard observer with limited technical interest.
It may only be 2 MP in resolution but it is far more compact. The DwarfLab Dwarf Mini is a darned sight more affordable, too. You could buy two or three for the price of one Seestar S50 Pro, depending what offers you can find.
One for backyard use and special astronomy trips, the much larger and heavier Celestron Origin (a reflector) comes in just shy of the Seestar S50 Pro's resolution but can produce detailed 6.4 MP images. However, it has recently been superseded by Celestron's Origin II, which matches the 8.3 MP resolution of ZWO's telescope here, if you have the coin.
Apple ratcheted up its lawsuit against OpenAI on Monday, telling a federal judge that the ChatGPT maker is destroying evidence while a former iPhone engineer used a confidential Apple circuit schematic in his new job.
In a court brief filed in support of expedited discovery, Apple said OpenAI is actively destroying crucial evidence in the Northern District of California case, which accuses the AI company, hardware chief Tang Yew Tan, former Apple engineer Chang Liu, and io Products of misappropriating hardware trade secrets. Apple also alleged that Liu “not only downloaded a confidential Apple circuit schematic but also used it in his work” at OpenAI.
The filing comes as Apple presses for early document production, forensic imaging of devices and accounts, and depositions of key witnesses. OpenAI has sought to dismiss the suit and has opposed Apple’s request for a fast-track discovery schedule and a preliminary injunction that would bar defendants from using or disclosing alleged Apple secrets while the case proceeds.
Apple sued in July, claiming a pattern of theft after OpenAI hired hundreds of former Apple employees and acquired Jony Ive’s hardware startup io. The complaint centers on Liu, an eight-year Apple senior systems electrical engineer who left in January 2026, and Tan, a 24-year Apple veteran who led iPhone and Watch product design and is now OpenAI’s chief hardware officer. Apple says Liu kept an Apple-issued laptop, exploited residual network access and an authentication bug, and downloaded dozens of confidential files—engineering presentations, specs for unreleased products, and manufacturing details for main logic boards—while already working for OpenAI. Tan, Apple alleges, used internal Apple project names in interviews and encouraged recruits to bring parts, prototypes, and supplier information.
OpenAI has denied the claims, calling the lawsuit careless and “oddly personal,” and saying it has no interest in Apple’s trade secrets. It has published messages it says show Apple employees contacting Liu after he left and asking for technical help, and it argues Apple delayed raising the core allegations for months.
As Bloomberg News’ Chris Welch and other reporters covering the Silicon Valley hardware race have noted, the case sits at the collision of two of tech’s most closely watched product efforts: Apple’s next devices under new CEO John Ternus and OpenAI’s push into consumer hardware after buying io. A hearing on Apple’s expedited-discovery motion is scheduled for Oct. 1 before Judge Edward Davila, though the court could rule sooner. Both companies declined additional comment beyond prior statements.
MacDailyNews Take: If you have nothing to hide, you don’t need a shredder. If your first device depends on Apple’s trade secrets, you definitely don’t want the schematics on your laptops.
Judge Davila gets this in October. Until then, OpenAI can keep insisting it’s all a misunderstanding. Apple is simply asking the court to look before the hard drives get “accidentally” wiped.
Please help support MacDailyNews — and enjoy subscriber-only articles, comments, chat, and more — by subscribing to our Substack: macdailynews.substack.com. Thank you!
The panel examines a Bluetooth-related earbuds vulnerability, debating whether the issue lies in the protocol or Apple’s proprietary pairing approach, and why the implications feel unsettling. Chuck Joiner, David Ginsburg, Eric Bolden, Ben Roethig, Marty Jencius, Jim Rea, Jeff Gamet, and Guy Serle also touch on a useful tool born from a creator’s own workflow before turning to another LastPass incident and where it puts them on the trust spectrum.
From the Flip the Script event in San Francisco, Dmytro Melnyk, Chief Product Officer for MacPaw, discusses his role and the importance of the company’s careful approach to adding AI across products, from both the developer and customer viewpoints.. He explains why some users want frictionless AI while others resist it over privacy, cost, and complexity, and outlines Eney's goal of combining many Mac utility tasks into one assistant with a pay-as-you-go model.
A new research project at the New Jersey Institute of Technology is taking a closer look at a strange but important behavior in rubber-like materials: their properties can depend on what happened to them before. With a $125,000 New Directions grant from the American Chemical Society Petroleum Research Fund, chemical and materials engineering professor Gennady Gor and his students will investigate how petroleum-derived polymers absorb fluids, swell, contract and change their elasticity over time. The work could improve predictions of how elastomers perform in everything from industrial seals to oil and gas equipment.
Elastomers are polymers capable of undergoing large, reversible deformations. Silicone, neoprene and natural or synthetic rubber are familiar examples. Their molecular chains can stretch, rearrange and return toward their original configuration, giving these materials their characteristic flexibility. Yet exposure to liquids or vapors can dramatically alter that behavior. Hydrocarbon molecules may enter the polymer network, pushing molecular chains apart and causing the material to expand. At the same time, the absorbed fluid can change the polymer’s stiffness, strength and ability to recover its original shape.
Gor’s project focuses on a phenomenon known as hysteresis, in which a material’s current state depends not only on its present conditions but also on the path it took to reach them. For an elastomer, that means the material may respond differently when it is swelling than when it is shrinking, even if its size and surrounding environment are identical. The difference can arise from molecular rearrangements, delayed relaxation or changes in the interactions between polymer chains and absorbed molecules. Such path-dependent behavior is central to understanding why materials sometimes fail to return fully to their previous mechanical state.
The question is especially relevant for petroleum-related technologies. Elastomers are widely used as O-rings, gaskets and seals because they can deform to fill microscopic gaps and maintain a hermetic barrier. In oil and gas environments, however, these components may encounter complex mixtures of hydrocarbons under pressure and at elevated temperatures. If a seal swells excessively, softens or loses its ability to recover after repeated exposure, it can become unreliable. A better understanding of hysteresis could help engineers select materials and operating conditions that reduce leakage and extend component lifetimes.
The new study represents a shift for Gor’s Laboratory for Materials Interfaces. His previous research has largely examined porous adsorbent materials, which collect molecules on their internal surfaces. Elastomers are different: they do not need pores to take up substantial amounts of fluid. Instead, molecules diffuse into the polymer matrix and interact with its flexible chains. The resulting process is more like a sponge absorbing liquid, although the molecular mechanisms are governed by diffusion, thermodynamics and the elasticity of the polymer network.
Günel Nabiyeva, a fourth-year doctoral student, will lead much of the experimental effort with undergraduate chemical engineering student Elitsa Mileva and second-year doctoral student Supun Rangana. The team has already begun collecting data on how rubber deforms in the presence of liquids and vapors. For Mileva, who has spent considerable time reviewing the scientific literature, the grant will provide an opportunity to move deeper into laboratory work. Nabiyeva describes the project as a new system for the research group because the laboratory has not previously studied elastomers in this way.
The researchers will expose polymer samples to controlled concentrations of hydrocarbon vapors and track how the materials respond. Their measurements will combine swelling, fluid uptake and elasticity rather than treating these properties separately. This approach is essential because a polymer can gain mass and volume while simultaneously becoming softer or, under some conditions, displaying a more complicated mechanical response. Different hydrocarbons may produce different results because their molecular size, chemical structure and compatibility with the polymer influence how quickly they enter the material and how strongly they interact with its chains.
Rangana will contribute expertise in ultrasonic sensing, which can measure subtle changes without physically contacting or damaging the sample. Ultrasonic waves travel through a material in ways that depend on its density, structure and mechanical properties. By analyzing changes in wave transmission or reflection, scientists can detect variations in stiffness and internal condition with high precision. Coupling these measurements to vapor exposure could reveal how quickly elasticity changes as molecules enter the polymer and whether the material follows the same path during desorption as it did during absorption.
The team hopes its results will fill a gap in the fundamental understanding of polymer hysteresis. Although hysteresis is well known in many areas of physics and engineering, relatively few studies have examined how history-dependent elasticity develops in swollen elastomers. The new measurements may help distinguish reversible molecular motions from more persistent structural changes and improve models used to predict polymer performance. Ultimately, the researchers aim to make elastomer behavior less mysterious and more reliable, helping engineers design seals and flexible components that remain dependable across repeated cycles of chemical exposure, swelling and recovery.
Subject of Research: Elastomers, petroleum-derived polymers, polymer swelling, elasticity and hysteresis
Article Title: Ultrasonic Experiments Aim to Reveal Why Rubber Remembers Its History
As Waymo deploys more driverless cars to 15 U.S. cities and counting, its vehicles keep encountering new and unexpected situations that they have no script to handle.
Baader AstroSolar Filter Film OD 5.0 is one of those "secret" astronomy products that looks almost too simple to be special. In its most familiar form, it’s a thin, silvery A3 or A4 sheet of metalized film that can be cut and mounted in cardboard, plastic or commercial filter cells. Surely it’s better to have a pre-made filter for your camera? Go to any solar eclipse, and you’ll get your answer: experienced eclipse photographers, solar observers and anyone wanting to safely point a camera or binoculars at the sun very often rely on Baader AstroSolar Filter Film OD 5.0.
Its popularity does not come from its ruggedness nor its out-of-the-box convenience. Whether bought as a loose sheet for making filters or as ready-made Baader solar filters for binoculars, camera lenses and telescopes, it enables super-sharp captures of sunspots on the sun, allowing much faster shutter speeds than some rival solar filter materials.
Although a brighter Baader AstroSolar Filter Film OD 3.8 Photo Film is also available (which is not designed for visual use), this review focuses on the Baader AstroSolar Filter Film OD 5.0, both as a practical DIY filter material and as the core of ready-made solar filters.
Baader AstroSolar Filter Film OD 5.0: Design
Baader AstroSolar Film can be used to make solar filters for all kinds of equipment.Jamie CarterBaader AstroSolar Film can be used for all kinds of solar images.Jamie Carter
Thin and delicate
Perfect for crafting homemade solar filters
Available as A4 and A5 sheets and ready-made filters
The defining feature of Baader AstroSolar Filter Film is how little there is to it. The film is extremely thin — around 0.01 mm — and feels much more fragile than tougher solar polymer materials. That can be disconcerting the first time you handle it. It wrinkles easily, but should never be pulled tight. However, initial fears are misplaced because a good homemade solar filter does not require the film to be flat. In fact, it should be mounted slightly slack, because wrinkles and ripples in the filter material actually improve the image.
The real design advantage is that AstroSolar Film is hugely versatile and can be cut to suit almost anything. A single sheet can be used to make a front filter for a telephoto lens or two, as well as for a couple pairs of binoculars. Any filter must always go over the front of the optics, never behind them. For binoculars, make a filter for one objective lens for safe one-eyed viewing and securely cap the other.
Key specifications:
Product type: AstroSolar Safety Film OD 5.0 solar filter film Material: Metalized film Thickness: Around 0.01 mm Light reduction: OD 5.0 blocks 99.999% of visible sunlight Solar color: Neutral white Formats: Loose sheets and pre-made filters
They are, of course, neater and more durable than homemade cardboard versions, but the optical principle is exactly the same. Besides, the loose sheet version is more attractive if you have several lenses or binoculars to cover, or if you want to make a filter that precisely fits a specific lens hood.
Baader AstroSolar Filter Film OD 5.0: Performance
An image of a partial solar eclipse in 2023, taken using a Baader filter.Jamie CarterAstroSolar Film gives the sun a neutral white appearance.Jamie Carter
Sharp solar detail
Neutral white color
Suits cameras and binoculars
Although its versatility makes it unusual, making DIY solar filters won’t be for everyone. However, the main reason to choose Baader AstroSolar Filter Film is for its image quality. When used correctly, it produces a sharp, high-contrast, white-light view of the sun. Sunspots appear cleanly defined, the solar limb looks crisp and the image has a neutral white tone, rather than the deep orange produced by some polymer filters.
That white rendering will not be to everyone’s taste. Casual eclipse watchers often expect the sun to look orange through solar filters because that is how it often appears through eclipse glasses and some glass or polymer solar filters. Baader’s version is a lot more clinical. For photographers, however, that is an advantage. A neutral white solar disk is easy to warm up later in editing, while a heavily colored orange image gives a little less flexibility. It all depends on your point of view.
The sharpness advantage comes from the fact that it allows shorter exposures, something that becomes more obvious as the focal length increases. In a short-lens or wide-field composition, the sun is small, so differences between filter materials are less obvious.
On a 400mm, 500mm or 600mm lens, where sunspots and the edge of the solar disk matter more, Baader AstroSolar Film OD 5.0 shows why it has such a strong reputation among eclipse photographers. In our tests at 400m set to f/8 and ISO 100, we found that exposures of 1/800s and 1/1,000s achieved the best results.
An image of the sun using 1/2,000s exposure. Jamie CarterAn image of the sun using 1/1,000s exposure. Jamie CarterAn image of the sun using 1/800s exposure. Jamie CarterAn image of the sun using 1/250s exposure. Jamie Carter
It also works well with binoculars. In fact, we’ve been traveling to watch solar eclipses using the same DIY solar filter fashioned from Baader AstroSolar Film OD 5.0 for a decade. Over the years, it’s been reinforced with plastic tape to extend its lifespan. It turns a pair of 10x50 binoculars into a safe solar-viewing instrument for the partial phases of an eclipse (just remember to cap the non-filtered lens).
The use of Baader AstroSolar Film is, of course, solely for capturing the partial phases of a solar eclipse, allowing safe imaging of the shrinking solar crescent. If you’re in the path of totality and about to watch a total solar eclipse, you’ll need to gently remove the filter when it gets dark.
That makes a homemade slip-on filter particularly attractive: it can be designed to slide off quickly, avoiding the fiddly delay of unscrewing a hot, threaded plastic or metal filter during the brief moments of totality. It’s wise to have an empty shirt pocket ready to take that filter for the few minutes of totality, which will keep it safe until the post-totality partial phases a few minutes later.
Baader AstroSolar Filter Film OD 5.0: Functionality
Homemade filters can be built from the A3 or A4 sheets of AstroSolar film.Jamie CarterReady-made Baader solar filters use the same core AstroSolar material.Jamie Carter
Easy to use for DIY projects
Works across many optical devices
Safety checks required
If you buy a solar filter that uses Baader AstroSolar Filter Film OD 5.0, you have an excellent product that requires care when traveling and storing. If you purchase it as a sheet of material, it requires some time and patience as well as cardboard, tape, glue and scissors to custom-build your own Baader AstroSolar Solar Filter for almost any optical device. That’s a huge advantage over many screw-in photographic filters, which only fit specific thread sizes.
As you’d expect, making a new solar filter for any new gear from an existing sheet of Baader AstroSolar Filter Film is much cheaper than investing in an all-new screw-in photographic filter.
The DIY construction is simple: two cardboard rings sandwich the film, then a short cardboard sleeve fits snugly over the lens hood, binocular objective or telescope tube. The result should be secure enough that it cannot fall off accidentally, but easy enough to remove deliberately. It’s a good idea to have some masking tape handy in your camera bag for added security, particularly if it’s windy and/or the sun is low on the horizon.
Whether your solar filter is pre-made or homemade, it’s important to inspect it before use, especially when using Baader AstroSolar Filter Film. Any holes, tears, or scratches are reasons to stop using the filter.
Should you buy Baader AstroSolar Filter Film?
Buy it if:
✅ You want to make your own solar filters.
✅ You need filters for camera lenses and binoculars.
✅ You want sharp, white-light solar images.
Don't buy it if:
❌ You want the simplest possible eclipse-viewing option.
❌ You don’t have the patience to craft your own solar filter.
❌ You prefer an orange solar image.
Baader AstroSolar Filter Film OD 5.0 is neither the most robust nor the quickest solution for casual eclipse viewing. Its delicate construction demands careful handling, storage and inspection before every use. For some users, a ready-made polymer or glass filter will be less stressful.
However, for photographers and binocular users, it’s hard to beat. It is light, sharp, adaptable and available in various forms for different solar imaging needs. Its greatest strength is that it allows you to create exactly the filter you need, whether that’s for a 400mm camera lens, one side of a pair of binoculars, a compact travel telescope or any other equipment.
Treat it gently and mount it securely, and Baader AstroSolar Filter Film remains one of the most useful solar filter materials available.
A new study published in the British Journal of Cancer is challenging the way lung-cancer risk is discussed among people who do not smoke conventional cigarettes. Researchers led by S. Vaja, J.L. Dickson and C. Horst examined the effects of cigar, cigarillo and pipe smoking, focusing on two questions with immediate public-health consequences: how these products influence the likelihood of developing lung cancer and whether their users are being identified as eligible for screening.
Lung-cancer prevention strategies have traditionally been built around cigarette consumption, especially the number of cigarette packs smoked per year. This measure, known as pack-years, combines smoking intensity and duration. One pack-year generally represents smoking 20 cigarettes a day for one year. Because cigars, cigarillos and pipes are used differently from cigarettes, their tobacco exposure is harder to convert into the same standardized measurement. That difference can leave regular users outside the systems designed to identify people at high risk.
The study addresses a persistent misconception: that alternative combustible tobacco products are inherently safer because they are not smoked in the same way as cigarettes. Cigar and pipe users may inhale less deeply or less frequently, but the smoke still contains carcinogenic compounds produced by burning tobacco. These include polycyclic aromatic hydrocarbons, tobacco-specific nitrosamines, volatile organic compounds and fine particulate matter. The precise dose entering the lungs can vary substantially, yet repeated exposure can still damage airway cells and contribute to mutations associated with cancer development.
Cigarillos occupy a particularly complicated position because they range from small, cigarette-like products to larger cigars that may be smoked over a longer period. Their nicotine content and smoke volume can also differ widely. Some users inhale cigarillo smoke deeply, while others do not. Pipes introduce another set of variables, including the duration of a smoking session, the amount of tobacco burned and the frequency with which the pipe is used. These differences make simple comparisons difficult, but they do not eliminate the biological hazards of combustion.
According to the research, the central concern is not only whether cigar, cigarillo and pipe smoking increases lung-cancer risk, but also whether current screening rules recognize that risk. Lung-cancer screening commonly relies on age and a history of cigarette smoking measured in pack-years. People who have smoked other combustible tobacco products may therefore be classified as having insufficient exposure, even when their cumulative tobacco use has been substantial. If risk is underestimated at the eligibility stage, some people could miss the opportunity to detect a tumour before symptoms appear.
Screening works by identifying disease at an earlier and more treatable stage, often using low-dose computed tomography, or LDCT. Unlike a conventional CT scan, LDCT uses a lower radiation dose to create detailed images of the lungs. Its effectiveness depends on selecting people whose probability of developing lung cancer is high enough to justify the benefits and potential harms of testing. Those harms include false-positive findings, unnecessary follow-up procedures, anxiety and cumulative radiation exposure. The challenge is to expand access without encouraging indiscriminate scanning.
The researchers’ analysis highlights why tobacco history needs to be recorded in greater detail. A questionnaire that asks only whether someone smokes cigarettes can overlook the frequency, duration and type of cigar, cigarillo or pipe use. It may also fail to capture former users whose exposure occurred years earlier. More comprehensive risk models could incorporate the number of products used, smoking intensity, years since quitting, inhalation patterns and additional factors such as age, occupational exposure, air pollution and family history.
The findings also carry a message for people who use these products socially or intermittently. Risk is not determined solely by whether smoking occurs every day. The biological impact depends on cumulative exposure, the composition of the product and how smoke is inhaled. Occasional use may carry less risk than heavy, long-term use, but “less” does not mean “none.” Combustible tobacco remains fundamentally different from non-combustible nicotine products because burning creates the toxic mixture responsible for much of the damage to the respiratory system.
The study does not suggest that every cigar or pipe smoker should automatically undergo a CT scan. Instead, it points to a gap between real-world tobacco exposure and the simplified categories used in many screening policies. The authors’ work could encourage clinicians and policymakers to assess alternative tobacco use more systematically and to investigate whether existing eligibility thresholds should be adapted. Any change would require careful validation, because screening recommendations must balance earlier diagnosis against the risks of testing people who are unlikely to benefit.
The broader lesson is that lung-cancer risk cannot be reduced to a single cigarette-based number. As smoking patterns evolve and tobacco products diversify, prevention programmes must keep pace with the ways people actually consume tobacco. The study by Vaja and colleagues adds evidence that cigar, cigarillo and pipe smoking deserve a more visible place in lung-health research and clinical risk assessment. For now, the clearest preventive message remains unchanged: avoiding all combustible tobacco products offers the strongest protection, while anyone with a history of substantial use should discuss their individual risk with a healthcare professional.
Subject of Research: The effects of cigar, cigarillo and pipe smoking on lung-cancer risk and eligibility for lung-cancer screening.
Article Title: The effect of cigar, cigarillo and pipe smoking on lung cancer risk and screening eligibility.
Article References: Vaja, S., Dickson, J.L., Horst, C. et al. “The effect of cigar, cigarillo and pipe smoking on lung cancer risk and screening eligibility.” British Journal of Cancer (2026). https://doi.org/10.1038/s41416-026-03578-9
Image Credits: AI Generated
DOI: 10.1038/s41416-026-03578-9
Keywords: lung cancer, cigar smoking, cigarillo smoking, pipe smoking, tobacco exposure, cancer screening, low-dose CT, smoking-related cancer, public health, epidemiology

 Login