❌

Normal view

ZWO Seestar S30 Pro smart telescope review

24 July 2026 at 21:00

Smart telescopes like the Seestar S30 Pro have changed astrophotography and, arguably, urban astronomy. The Seestar S30 Pro takes that concept further than most. Small enough to fit inside a camera backpack, it combines a refractor telescope, motorized mount, dual cameras and image-processing software into a compact unit controlled entirely from a smartphone. Within minutes of powering on, it can align itself to the night sky, slew to a specified target and begin stacking exposures to reveal galaxies, nebulas and star clusters β€” even from light-polluted locations.

A close-up of the the logo on the ZWO Seestar S30 Pro.

The Pro version of the S30 adds a higher resolution sensor, advanced optics and upgraded software functionality. (Image credit: Jamie Carter)

It makes astrophotography β€” once a complex and expensive hobby β€” possible with a single, automated device, though what makes the Seestar S30 Pro particularly interesting is not just its simplicity, but how it changes the experience of observing. Instead of actively operating a telescope, users watch a digital image build in real time. Sure, your eyes don’t see the photons coming from distant galaxies, but that misses the point β€” urban astronomers can’t see much of those galaxies anyway when using an optical telescope.

The Seestar logo on the ZWO Seestar S30 Pro.

(Image credit: Jamie Carter)

Positioned as an upgrade to the original Seestar S30, it introduces higher-resolution 8.3MP imaging, equatorial tracking support and expanded imaging modes aimed at more advanced users.

Designed for beginners, urban astronomers and astrophotographers of any level who are looking for a portable rig, the Seestar S30 Pro is about convenience, capability and a different way to explore the night sky.

ZWO Seestar S30 Pro smart telescope review

ZWO Seestar S30 Pro: Design

A close-up on the side of the optical tube on the ZWO Seestar S30 Pro pointing upwards.

The Seestar S30 Pro features four lens elements in an optical design called an apochromatic quadruplet refractor. (Image credit: Jamie Carter)
  • Lightweight design
  • Dual-camera system
  • Full smartphone control

At first glance, the Seestar S30 Pro barely resembles a telescope, being closer in size to a telephoto lens than a traditional optical instrument. That portability is one of its defining strengths β€” this is a telescope you can realistically take anywhere, whether into a backyard, onto a balcony or on a dark-sky trip. You could even take it as hand luggage on a trip to see a total solar eclipse in a distant land.

The ZWO Seestar S30 Pro mounted on a tripod on a wooden table.
When packed away the Seestar S30 Pro is very compact and highly portable.Jamie Carter
A bird's eye view of the ZWO Seestar S30 Pro on a wooden table.
Weighing just 3.6 lbs (1.65 kg) it is the lightest apochromatic quadruplet smart telescope.Jamie Carter

The design is deliberately minimal. Aside from a power button and USB-C slot, there are no physical controls. Everything β€” from slewing and focusing to image capture and processing β€” is handled through the Seestar app. Once connected to a phone via its own WiFi network, the system operates entirely offline, connecting directly to your phone without requiring an internet connection in the field.

The USB-C slot on the ZWO Seestar S30 Pro.
Apart from the power button and USB-C slot on the S30 Pro, there are no physical controls as everything is controlled by the app.Jamie Carter
A close-up on the side of the optical tube on the ZWO Seestar S30 Pro.
The Seestar S30 Pro combines a telescope, camera and automated mount in a single unit. Jamie Carter
Specifications

Optical design: Quadruplet apochromatic refractor (ED glass)

Aperture: 30mm / 1.18 inches

Focal length: 160mm / 6.3 inches

Focal ratio: f/5.3

Sensor: Sony IMX585 (tele) / Sony IMX586 (wide)

Resolution: 8.3MP (3,840 x 2,160)

Field of view: 4.6 degrees (tele) / 63 degrees (wide)

Mount type: Alt-azimuth (EQ mode supported)

Storage: 128GB internal

Battery: 6000 mAh (~6 hours)

Weight: 3.6 lbs (1.65 kg)

Dimensions: 8.25 x 5.5 x 3.15-in (210 x 140 x 80 mm)

A key feature of this new, improved model is its dual-camera system. The primary telephoto camera is dedicated to deep-sky imaging, using a Sony IMX585 sensor that’s capable of 8.3MP (4K) images, while the secondary wide-angle uses an equally capable Sony IMX586 sensor for sky alignment and wide-field imaging modes.

The tripod ZWO Seestar S30 Pro splayed open.

Any tripod can be used with the Seestar S30 Pro. (Image credit: Jamie Carter)

The included tabletop tripod is solid, if small, so users with backyards surrounded by buildings or trees will benefit from mounting the device on a full-size photographic tripod. It also comes with a handy, high-quality padded shoulder bag to store the telescope and all its accessories.

ZWO Seestar S30 Pro: Performance

Cropped view of the Orion Nebula (M42), as imaged by the ZWO Seestar S30 Pro in alt-azimuth mode.

The Orion Nebula (M42) shot in alt-azimuth mode. (Image credit: Jamie Carter)
  • Automatic stacking with intelligent frame rejection
  • EQ mode enables longer exposures
  • Strong results under urban/suburban skies

Using the Seestar S30 Pro is less about operating equipment and more about using an app. After powering on and connecting via WiFi, the telescope automatically plate-solves the stars overhead, determines its position and slews to a selected target. Within minutes, it begins capturing short exposures β€” typically around 10 seconds β€” which are stacked in real time to reduce noise and improve detail. Crucially, the system automatically discards poor-quality frames caused by tracking errors, wind shake or star trailing.

Bode’s Galaxy (M81) and the Cigar Galaxy (M82) as imaged by the ZWO Seestar S30 Pro alt-azimuth mode.

Bode’s Galaxy (M81) and the Cigar Galaxy (M82) shot in alt-azimuth mode. (Image credit: Jamie Carter)

The effect of the image stacking is gradual. As more data is collected, a faint patch of light slowly resolves into a nebula or distant galaxy. The longer the telescope runs, the clearer and more detailed the final image becomes, with nebulosity and spiral arms becoming visible. Stars remain sharp across the field of view β€” the Seestar S30 Pro’s optics may be small, but they are excellent quality. During our test, we produced some superb images of the Orion Nebula (M42), as well as Bode’s Galaxy (M81) and the Cigar Galaxy (M82), the Whirlpool Galaxy (M51) and the Great Globular Cluster in Hercules (M13).

The first-quarter moon as imaged by the ZWO Seestar S30 Pro.

The first-quarter moon imaged by the Seestar S30 Pro. (Image credit: Jamie Carter)

Stacking images is a hugely effective way to do observational astronomy under light-polluted urban skies. By stacking multiple exposures and applying built-in filters (there are three), the Seestar S30 Pro can reveal objects that would otherwise be invisible through the eyepiece of a traditional optical telescope.

The Whirlpool Galaxy (M51), as imaged with the ZWO Seestar S30 Pro in EQ mode and edited with Deep Sky Stack and AI Denoise.
The Whirlpool Galaxy (M51) shot in EQ mode, edited using Deep Sky Stack and with AI Denoise applied.Jamie Carter
The Great Globular Cluster in Hercules (M13) as imaged by the ZWO Seestar S30 Pro in EQ mode.
The Great Globular Cluster in Hercules (M13) shot in EQ mode, edited using Deep Sky Stack and with AI Denoise applied.Jamie Carter

The all-new equatorial (EQ) mode extends performance further, though aligning the telescope with Earth’s rotation requires purchasing the add-on Seestar TH10 Fluid Tripod Head. This is easy to set up, thanks to an in-app setup process that perfectly positions the tripod and ball head. With Expert Mode engaged, exposures of up to 60 seconds are possible. We tried it on two faint targets β€” the Whirlpool Galaxy (M51) and the Great Globular Cluster in Hercules (M13) β€” and got much greater detail.

Jupiter and its mons as image by the ZWO Seestar S30 Pro

Jupiter and its moons, as imaged by the Seestar S30 Pro. (Image credit: Jamie Carter)

Planetary imaging is less impressive, with planets appearing small and lacking fine detail. That said, we did manage to image Jupiter and its moons. The telescope is clearly optimized for deep-sky imaging rather than solar system work β€” the exception being the moon, which looked fabulous through the Seestar S30 Pro.

ZWO Seestar S30 Pro: Functionality

Screenshots from the Seestar app showing object identification, editing capability and astronomical information.

The Seestar app identifies objects, and offers editing and astronomical information. (Image credit: Jamie Carter)
  • Intuitive smartphone app
  • Automated imaging and Plan mode
  • Built-in processing and FITS export

The Seestar app is central to the entire experience. It acts as both controller and processing platform, offering a planetarium-style sky atlas that displays objects visible from the user’s location. Selecting a target triggers automatic alignment, slewing and image capture. Once imaging begins, the app displays real-time progress, including exposure count and total integration time. Users can stop a session at any time or continue it for deeper results. The telescope can operate largely unattended, making it easy to leave running and check later.

Screeshots from the Seestar app showing how to set up EQ mode on the ZWO Seestar S30 Pro.

Equatorial (EQ) mode set-up on the Seestar S30 Pro app for longer exposure times. (Image credit: Jamie Carter)

If all of this is beginning to sound like the Seestar S30 Pro is ideal for lazy astronomers, it doesn’t end there. Cue the app’s Plan mode, which allows users to schedule multiple targets for imaging overnight. Orion Nebula not rising until 3 a.m.? No problem. Pre-sunrise comet? Stay in bed. Assuming you’ve checked for clear skies beforehand, the Seestar S30 Pro can observe while you sleep. However, Plan mode does come with limits: exposure time and gain cannot be fine-tuned per target, so users must rely on default settings. For most, that won’t deter.

Screenshots from the Seestar app's Sky Atlas, showing the location of night sky targets.

The Seestar app’s Sky Atlas makes it easy to find objects. (Image credit: Jamie Carter)

For those interested in post-processing, the Seestar S30 Pro supports FITS file export, enabling images to be refined in external software such as Siril, PixInsight, DeepSkyStacker or Photoshop (though advanced users dealing in FITS files may find that the system’s 128GB internal storage needs frequent attention). Alternatively, the built-in Deep Sky Stack provides quick results with minimal effort, allowing frames to be discarded and the effective AI Denoise pipeline to be engaged β€” something that takes a little patience, but delivers excellent results.

How we tested the ZWO Seestar S30 Pro

A bird's eye view the ZWO Seestar S30 Pro pointing upwards.

The Seestar S30 Pro has a tiny footprint. (Image credit: Jamie Carter)

Testing took place over multiple nights during late winter and early spring, under suburban Bortle 6 skies in cold but not freezing temperatures. It was also used in Bortle 2 skies in sub-zero temperatures, with no ill effects on the 6-hour battery life. The telescope was used to image a variety of deep-sky objects, with sessions ranging from short captures to integrations lasting several hours. Both standard alt-az mode and EQ mode were tested.

Should you buy the ZWO Seestar S30 Pro?

Buy it if:

βœ… You want an easy, automated entry into astrophotography: The S30 Pro is incredibly easy to use and highly portable without skimping on optical quality.

βœ… You observe from light-polluted locations: Built-in image processing and stacking allows fine details to be resolved on deep sky objects even when observing from light-polluted locations.

Don't buy it if:

❌ You want full manual control over imaging: Whilst having equatorial (EQ) imaging mode and certain modes for the Milky Way and 8K wide-field stitching, it actually lacks custom exposure times and gain control for precision tweaking.

❌ You’re primarily interested in planetary observation: The S30 Pro is capable of imaging planets but they just aren't as impressive as its deep-sky images.

The Seestar S30 Pro is best understood not as a traditional telescope, but as an automated imaging system designed to make astrophotography accessible. It’s also an upgrade on the Seestar S30 that may or may not be worth the money, depending on your needs.

For beginners, it provides a clear pathway into astrophotography without the usual financial or technical barriers. For more advanced users, it’s an efficient grab-and-go system for casual or supplementary imaging.

If the ZWO Seestar S30 Pro isn't for you

If you’re looking for a more affordable entry point, the ZWO Seestar S30 offers similar ease of use, but with lower (2MP) resolution and fewer advanced features. For those who simply want basic, shareable images, it remains a strong alternative.

The DwarfLab Dwarf Mini is even smaller and more portable but it is limited to 2MP imaging. At the other end of the market, the Unistellar Odyssey is a premium smart telescope offering much larger apertures and access to citizen science campaigns, albeit at significantly higher prices.

For an overview of the top telescopes in this category, read our guide to the best smart telescopes.

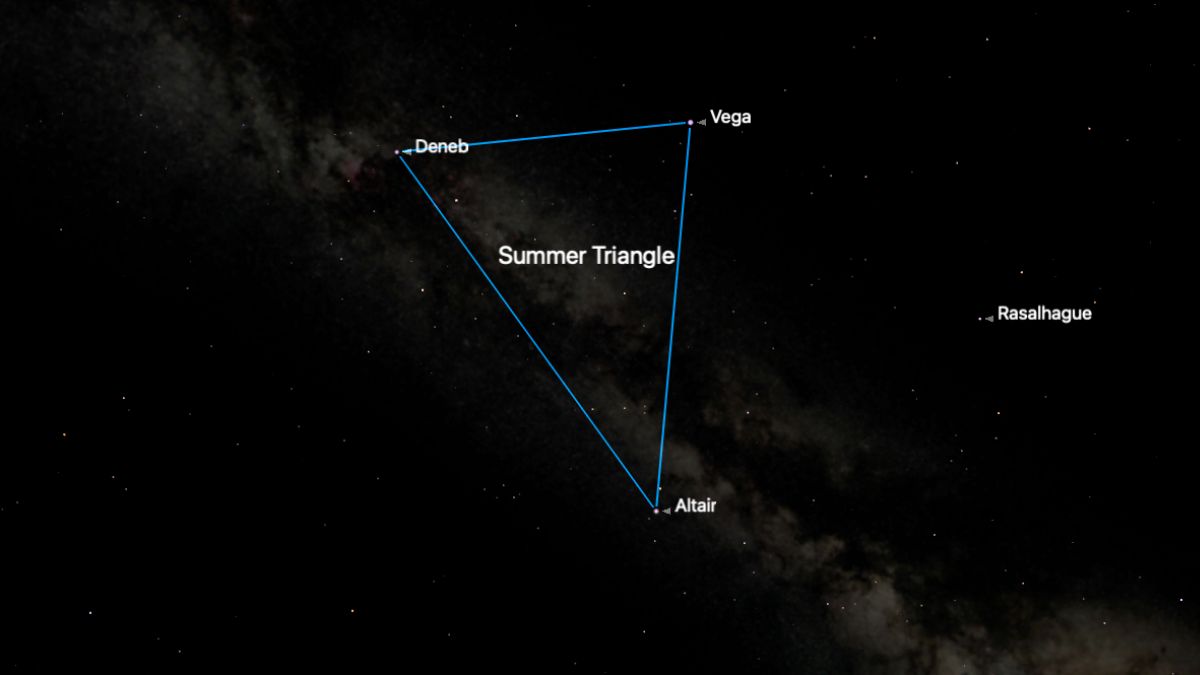
The easiest way to learn the summer night sky starts with these 3 stars

24 July 2026 at 14:00

There is a particular moment every July when the night sky makes perfect sense to me. Every time I step outside at night, I instinctively look overhead for the Summer Triangle. Not because it's the most spectacular sight in the sky. In fact, the vast asterism is almost suspiciously simple: three bright stars, large enough to cut through twilight and light pollution without much effort.

Experienced stargazers quietly depend on the Summer Triangle more than we admit. People imagine astronomy involves memorizing the entire sky at once, knowing exactly where each star is and what it's called. Everyone navigates differently, but we all rely on familiar anchor points because the night sky changes quickly with the seasons.

The Summer Triangle is one of the best anchors because it appears exactly when the northern sky can otherwise feel vague and washed out during late twilight. Once those three stars appear, I immediately know where everything else is. The Milky Way becomes easier to trace. The darker regions of the sky reveal themselves. Constellations stop looking random. Suddenly, I know where the Perseids will emerge from later in the night and where to point binoculars to find summer's dense star fields without even thinking about it.

The Summer Triangle also teaches you how to see the night sky. To the untrained eye, the night sky appears as a flat backdrop of stars β€” hence the "blanket of stars" saying. Every time I hear that cliche, I wince. There is no blanket! The night sky has incredible depth, and there's nowhere better to learn how to appreciate that than when gazing at the Summer Triangle.

Take Altair, the lowest star. It's relatively nearby at about 17 light-years away. It shines brightly largely because it is close to us. Vega lies slightly farther away at roughly 25 light-years, but it is intrinsically far more luminous. It once served as Earth's North Star thousands of years ago and, thanks to our planet's slow axial wobble, will become the North Star again many millennia from now. So far, so local β€” we're in the sun's backyard with these two stars. The light from both of them began its journey to us this century.

Then there's Deneb. Deneb is so distant β€” roughly 2,600 light-years away β€” that the fact it appears this bright at all becomes genuinely difficult to process. Its light began traveling toward Earth while the Roman Empire was still in existence. The only reason it remains prominent in our sky is that Deneb is an enormously luminous supergiant radiating tens of thousands of times more energy than the sun.

Knowing this about Deneb transforms the Summer Triangle into a three-dimensional shape. Here are three stars that appear neatly connected overhead, but in reality, one is separated by an incomprehensible distance. So next time you look at the Summer Triangle, keep Altair and Vega at the front and push Deneb way, way back. It's not a triangle anymore β€” it's an arrow pointing far into the distance, thousands of light-years away into the starfields of the distant Milky Way.

What's happening and when to look

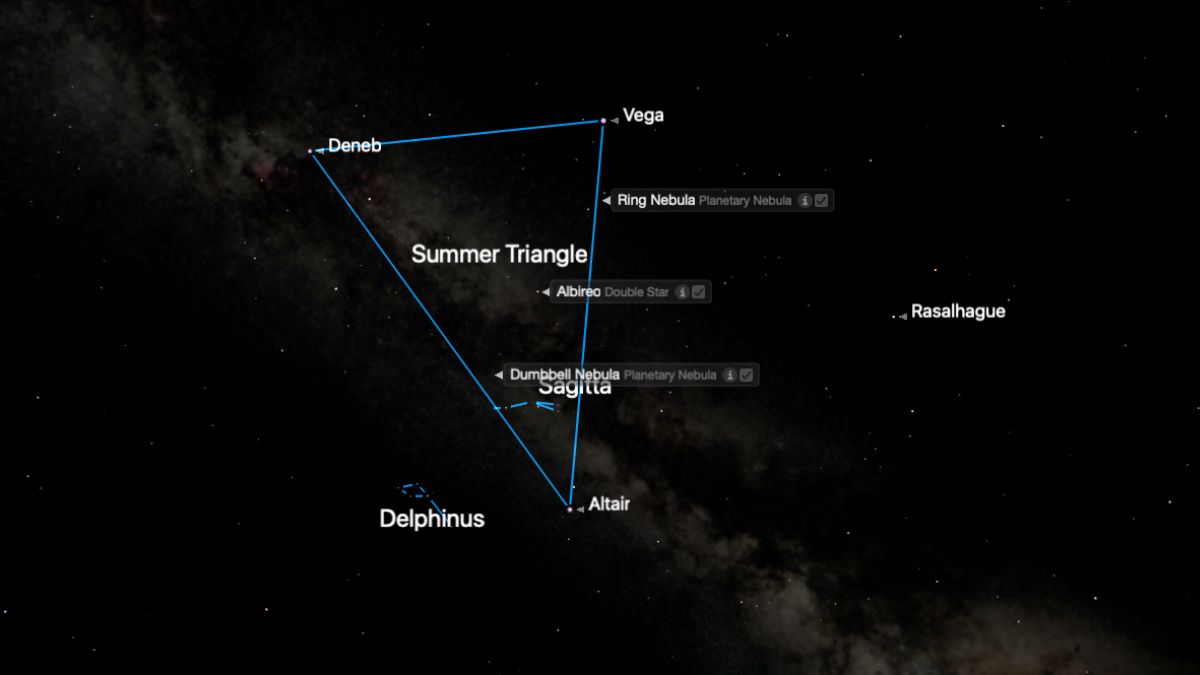
night sky graphic showing the summer triangle asterism

Deneb is vastly farther from the sun than Altair and Vega. (Image credit: Starry Night)

This week is the perfect time to reacquaint yourself with the Summer Triangle using just your naked eyes. Around 11 p.m. local time at mid-latitudes of the Northern Hemisphere, look high in the southeast. Vega is usually the first to appear, high and brilliant with a slightly blue-white color. To its lower left sits Deneb. Farther south is Altair. By midnight, the entire Summer Triangle stands high overhead and remains one of the defining features of the northern summer sky through October.

Stretching directly through it is our view into the Orion Arm of the Milky Way β€” the spiral arm of the galaxy containing the solar system itself β€” while farther south, the glowing river of starlight continues toward the galactic core near the constellations Sagittarius and Scorpius, low on the horizon. Under dark skies, the Milky Way visibly streams behind Deneb and through Altair like a river of stars.

How and when I'm watching it

night sky graphic showing the summer triangle and a number of skywatching targets located within it.

There are many wonders within the Summer Triangle. (Image credit: Starry Night)

Once I start slowly sweeping binoculars through the Summer Triangle, I usually lose all sense of structure and planning. Dense star clouds spill into view everywhere. Dark lanes slice through the Milky Way. Tiny clusters appear almost accidentally. The region between Deneb and Altair may be my favorite casual binocular territory in the entire sky.

Inside the Summer Triangle itself lies the Cygnus Star Cloud, one of the richest naked-eye sections of the Milky Way visible from northern latitudes. Nearby are the Ring Nebula and the Dumbbell Nebula. The beautiful double star Albireo β€” one bright yellow and the other a fainter blue β€” sits at the beak of Cygnus, the Swan.

I'll also look for a couple of smaller constellations within and around the Summer Triangle β€” Delphinus, the Dolphin, hovers to the left of Altair, while tiny Sagitta, the Arrow, hangs above Altair, looking improbably compact.

That's another thing the Summer Triangle taught me β€” astronomy improves dramatically once you stop hunting objects individually and start exploring regions instead. It's armchair travel of the grandest kind.

If you're looking for a telescope or binoculars to observe the night sky, our guides for the best binocular deals and the best telescope deals can help. Our best cameras for astrophotography and best lenses for astrophotography can help you get ready to capture the next stunning skywatching event.

Stargazer's corner: July 24-31, 2026

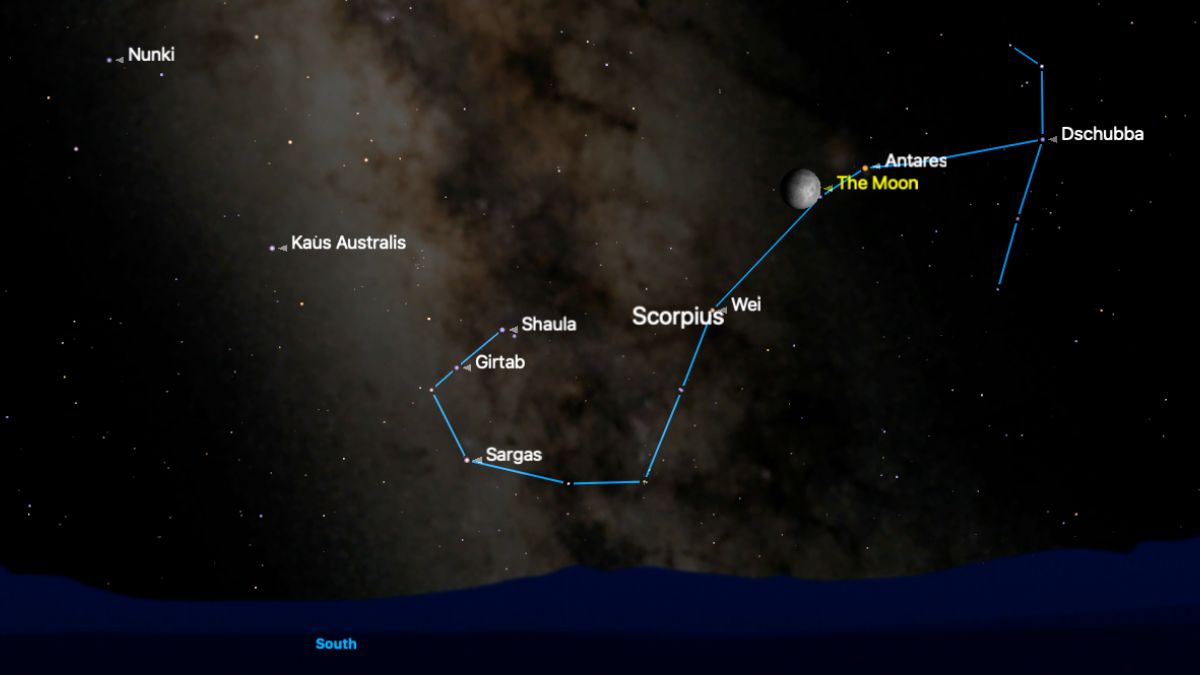
night sky graphic showing the moon shining to the left of Antares.

See the moon and Antares on July 24. (Image credit: Starry Night)

The moon will move beneath the Summer Triangle this week, appearing as an 81%-illuminated waxing gibbous moon as it shines close to supergiant star Antares in the constellation Scorpius, on Friday, July 24. By now, the moon is dominating the night sky, albeit low on the horizon, and on Wednesday, July 29 β€” the night before the full Buck Moon β€” the Summer Triangle will appear to point straight at it. Late July also marks the gradual strengthening of the Perseid meteor shower, with occasional early meteors now appearing after midnight. The Southern Delta Aquariids and Alpha Capricornids peak around Thursday-Friday, July 30-31, though the full moon will reduce visibility of fainter meteors considerably.

Constellation of the week: Sagitta

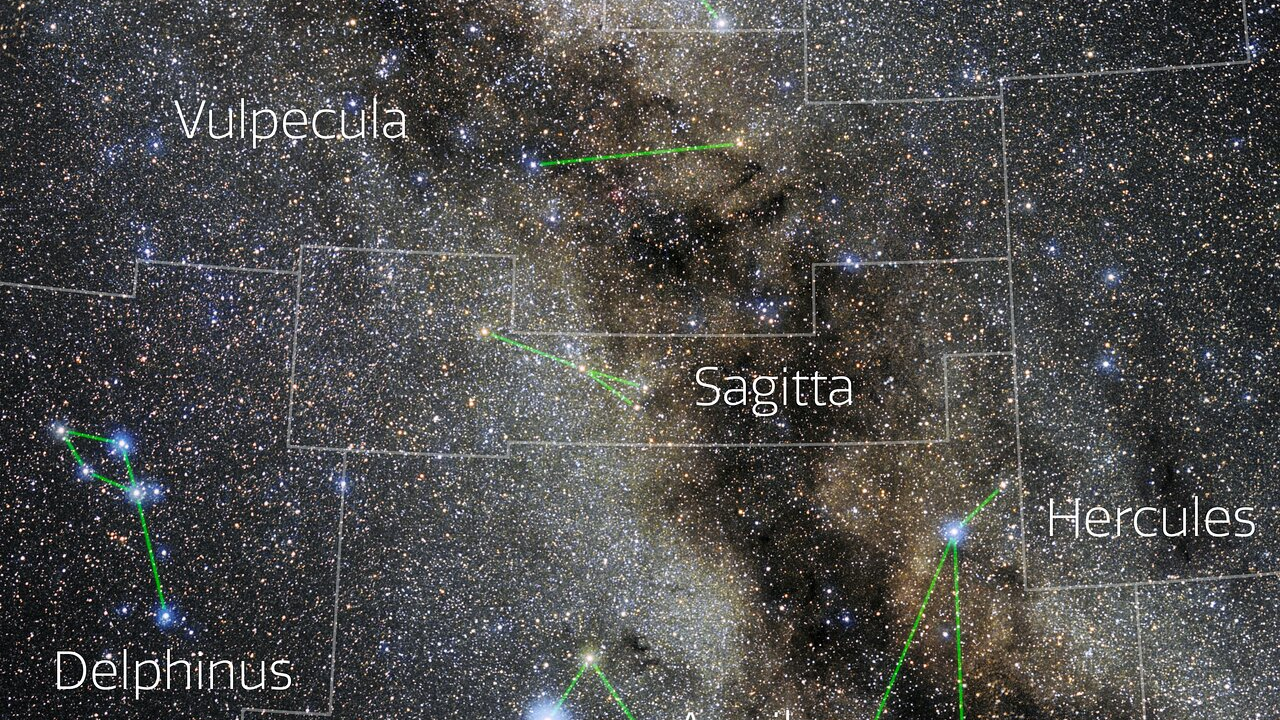
night sky map showing the constellation sagitta and the milky way stretching through the sky behind.

The tiny constellation Sagitta. (Image credit: E. Slawik/NOIRLab/NSF/AURA/M. Zamani)

Sagitta, the Arrow, is one of the smallest constellations, but also one of the easiest to recognize once you've found it. It appears as a short line of five stars β€” all between 450-650 light-years distant β€” with an arrowhead, shaft and two stars as the fletchings. It's between Cygnus and Aquila.

It's not bright, but it's well-defined, and once you spot it, it becomes a reliable reference point. Learning these smaller constellations helps fill in the gaps between the more obvious patterns.

How much better is the Canon EOS R6 III than previous models for astrophotography?

23 July 2026 at 19:00

In a rare first for me, I actually used autofocus for this entire astrophotography shoot. If I'm being honest? I prefer it when shooting astro with a mirrorless camera. Why? Because it is quicker and that means more time capturing the stars and less time setting up. I can get a star in sharp focus using autofocus in half the time that it would take me to do it manually and it's way easier to focus with the shutter or back button than play about with the focus ring, especially with cold fingers.

The back panel and screen of the Canon EOS R6 III.

The Canon EOS R6 III makes shooting astro much quicker with its rapid low-light autofocus. (Image credit: Harry Bennett / Future)

I only managed to get out under one clear sky to test the new R6 III but it was a wonderful session at my usual dark hill spot surrounded by a sea of stars and celestial shapes. After setting up my tripod, I was ready to start shooting, armed with the Canon 14mm f/1.4 and 45mm f/1.2 lenses.

The Canon EOS R6 III with the Canon RF 14mm f/1.4 lens attached and propped up by the lens cover, on a brown carpet.
Pairing the R6 III with the RF 14mm f/1.4 lens is a perfect set up for astrophotography.Harry Bennett / Future
The Canon EOS R6 III with the Canon RF 45mm f/1.2 lens attached and propped up by the lens cover, on a brown carpet.
I also tried it with the Canon RF 45mm f/1.2 lens, which delivered exceptional aperture performance, albeit with a few spots of chromatic aberration.Harry Bennett / Future

If you are a seasoned astrophotographer, you will undoubtedly have started your craft by learning how to manually focus on stars to get them crisp and sharp in the frame. Everyone does. Whilst the manual focus (MF) versus autofocus (AF) debate continues within the community, the technology for low-light autofocusing capability has come a long way since mirrorless cameras were first introduced and the R6 III is physical proof of that.

The astrophotography

The stars Mizar and Alcor with the handle of the Big Dipper, as imaged by the Canon EOS R6 III.

Mizar and Alcor in the panhandle of the Big Dipper. Shot with Canon EOS R6 III and RF 45mm f/1.2 lens, Aperture: f/1.2, Shutter speed: 2 sec, ISO 500 | Bortle class 4. (Image credit: Harry Bennett / Future)

You only get the luxury of being able to do this if your camera is actually good at autofocusing in low light and for starry nightscapes. All three versions of the Canon EOS R6 feature a low-light autofocus range of -6.5 exposure value (EV), so they already have a strong baseline for shooting under dark skies. The Canon EOS R6 III features a higher resolution and advanced autofocus algorithms, so the AF system actually has more data to use and is better at using it.

I was able to capture bright objects easily and start shooting without having to spend ages using manual focus for each new shot. The autofocus was powerful enough to capture at least one star in each of my frames. I simply used autofocus on the brighter points of light in my composition, waited for the green box and then switched to manual to avoid any refocusing if I decided to recompose the shot.

A closeup of Jupiter, Pollux and Castor as imaged by the Canon EOS R6 III.

Pollux and Castor above Jupiter. Shot with Canon EOS R6 III and RF 45mm f/1.2 lens, Aperture: f/1.2, Shutter speed: 2 sec, ISO 500 | Bortle class 4. (Image credit: Harry Bennett / Future)

Bright objects were the easiest to capture, with Jupiter, Pollux and Castor easily captured in the western sky. Light pollution washed out the contrast in this shot but it was the quickest autofocus because of the brightness of the objects.

The autofocus helped me capture a range of other constellations too. With the R6 III focusing on the bright star Arcturus, along with the rest of BoΓΆtes and Coma Berenices next to the Coma Star Cluster (Melotte 111).

Arcturus, BoΓΆtes, Coma Berenices and the Coma Star cluster as imaged by the Canon EOS R6 III.

Arcturus, BoΓΆtes, Coma Berenices and the Coma Star cluster (Melotte 111). Shot with Canon EOS R6 III and RF 14mm f/1.4 lens, Aperture: f/1.4, Shutter speed: 8 sec, ISO 800 | Bortle class 4. (Image credit: Harry Bennett / Future)

The shape of Leo is recognisable and the autofocus captured the brightest star, Regulus, to bring the rest of the stars in the constellation into focus. You can even spot the Beehive Cluster (M44) in Cancer, to the right of the frame and it is fairly sharp in focus. Barring some minor star trailing from my lack of a star tracker, the stars are nicely in focus, including on minor objects like star clusters.

Regulus, Leo and the Beehive cluster as imaged by the Canon EOS R6 III.

Regulus in Leo, with the Beehive Cluster (M44) in the bottom right. Shot with Canon EOS R6 III and RF 14mm f/1.4 lens, Aperture: f/1.4, Shutter speed: 6 sec, ISO 640 | Bortle class 4. (Image credit: Harry Bennett / Future)

Using the 45mm lens, I got some close-ups of some quadrilateral shapes in the sky. Hercules' prominent trapezoidal keystone is visible and one of the corners, Zeta Herculis, was picked up by the autofocus. It is not exactly a bright star, with a magnitude of 2.88, but the R6 III picked it up easily and brought the rest of the corners into focus. Whilst barely a smudge along one of the sides of Hercules, I even managed to capture the Hercules globular cluster (M13) with the R6 III and the Canon RF 45mm wide open at f/1.2.

The keystone of the constellation Hercules, as imaged by the Canon EOS R6 III.
The keystone of Hercules. Shot with Canon EOS R6 III and RF 45mm f/1.2 lens, Aperture: f/1.2, Shutter speed: 2 sec, ISO 2500 | Bortle class 4.Harry Bennett / Future
The Hercules Globular cluster (M13) as imaged by the Canon EOS R6 III.
A cropped view of the Hercules Globular cluster (M13). Shot with Canon EOS R6 III and RF 45mm f/1.2 lens, Aperture: f/1.2, Shutter speed: 2 sec, ISO 2500 | Bortle class 4.Harry Bennett / Future
The head of the constellation Draco and the star Iota Herculis, as imaged by the Canon EOS R6 III.
The 'head of the dragon' in Draco, with Iota Herculis to the right. Shot with Canon EOS R6 III and RF 45mm f/1.2 lens, Aperture: f/1.2, Shutter speed: 2 sec, ISO 2500 | Bortle class 4.Harry Bennett / Future

The polygonal head of the dragon in Draco was easily captured in the centre of the frame, with bright stars Eltanin (2.23), Rastaban (2.79) and even Iota Herculis (3.8) showing prominently. The autofocus capabilities of the EOS R6 III are maximised when used alongside a lens with a very fast aperture like f/1.4 and f/1.2. Without these types of lenses, you would be much less likely to be able to autofocus on such dim stars.

The upgrades

The big question when looking at the third iteration of a camera model is to figure out if the upgrades are actually worth it. First, you have to think about your budget and also what you are using the camera for. For astrophotography, there are a few upgrades in the EOS R6 III that can be considered to see whether they are worth it.

The most noticeable upgrade on the R6 III is the resolution, which has been upgraded from the R6 II's 24.2MP sensor to a 32.5 MP sensor. On top of improved resolution for general and astrophotography, the boosted number of pixels allows the Dual Pixel CMOS AF II to collect even more data points because there are more pixels. Dual Pixel architecture splits each pixel into two separate photodiodes and allows each photodiode to read the light from the star at two different positions and allows the lens motor to bring those points together into perfect focus.

The front of the Canon EOS R6 III without a lens on a brown carpet.

(Image credit: Harry Bennett / Future)

The upgraded sensor resolution combined with upgraded tracking algorithms from the flagship Canon EOS R5 II make the R6 III better at locking onto low-light points and make autofocus for astrophotography much more reliable than in previous models.

I initially expected the higher resolution to translate into more image noise on photographs but this was not the case. The R6 III utilizes dual-gate gain architecture, which means that every pixel has a switchable path at the hardware level depending on the ISO level used and allows images with higher ISOs to have a heavily reduced base amount of noise and thus makes them less grainy.

Orange star Pi Herculis next to Rho Herculis, as imaged by the Canon EOS R6 III.
A cropped view of the orange star Pi Herculis in the keystone of Hercules. Shot with Canon EOS R6 III and RF 45mm f/1.2 lens. Aperture: f/1.2, Shutter speed: 2 sec, ISO 2500 | Bortle class 4.Harry Bennett / Future
Jupiter, Pollux and Castor as imaged by the Canon EOS R6 III.
Jupiter beneath Pollux and Castor, with Venus and Auriga to the right. Shot with Canon EOS R6 III and RF 14mm f/1.4 lens, Aperture: f/1.4, Shutter speed: 2 sec, ISO 800 | Bortle class 4.Harry Bennett / Future

Photos at lower ISOs on the R6 III have an incredibly high dynamic range (HDR) thanks to the low conversion gate (LCG) circuit. This allows the natural color of the stars to be preserved instead of coming across as indeterminate white blobs, as well as the subtle hues of the dark surrounding sky in the photograph.

A blue sky with clouds surrounded by trees with a fisheye distortion as imaged by the Canon EOS R6 III and Canon RF 7-14mm f/2.8-3.5 fisheye lens.

A cloudy blue sky. Shot with Canon EOS R6 III and RF 7-14mm f/2.8-3.5 fisheye lens, Aperture: f/8, Shutter speed: 1/125 second, ISO 125. (Image credit: Harry Bennett / Future)

Aside from the technical aspects of how the resolution improves the autofocus, the detail in images from the R6 III is noticeable and is great for picking up finer stellar structures such as star clusters and smaller stars. When paired with a distorted lens like the Canon RF 7-14mm f/2.8-3.5 fisheye lens, extra resolution really helps details pop. I didn't get to use the fisheye lens for astro but general daytime shooting delivered some high-quality photographs.

The CFexpress card and SD card slot on the Canon EOS R6 III.

The addition of CFexpress card slot will please professional photographers who need the fastest read and write speeds for their workflow. (Image credit: Harry Bennett / Future)

The final important upgrade on the R6 III is the inclusion of a CFexpress card slot, which allows faster writing and reading speeds both in camera and during media downloads. A UHS-II SD card has an average read speed of 300MB/s and an average write speed of 260MB/s.

This may seem fast but the most advanced CFexpress cards have a read and write speed of over 3000MB/s, which makes huge workloads so much easier to process. This may only be of benefit to professional photographers who shoot a lot of video or need to do a huge amount of burst photography in RAW format, but it does vastly improve the performance of this camera. Bear in mind that CFexpress cards are much more expensive than SD cards and require an additional CFexpress reader to transfer data to a computer.

Is it worth it?

The viewfinder and top controls of the Canon EOS R6 III.

The controls on the EOS R6 III are essentially the same as the EOS R6 II. (Image credit: Harry Bennett / Future)

The price difference between the R6 Mark II and the Mark III is just under $1000 and for that amount of money, justifying the move up to the latest model comes down to a few factors that you will have to consider. The power of the low-light autofocus is tempting but you should think about the camera as a whole to see whether it is worth making the investment.

Canon EOS R6 Mark II and RF 35mm f/1.4L on a wooden floor

We gave the Canon EOS R6 II a huge five stars. (Image credit: James Abbott)

If you are looking to boost resolution in your night-time scenes and have been shooting astrophotography for a long time, the R6 III could be worth the extra investment thanks to the 32.5MP sensor, which retains the powerful dual-gain architecture for getting high dynamic range images at lower ISOs and delivering high ISO images with significantly less grain.

If you have a heavy workflow, you are likely to be frustrated with the lack of a CFexpress card slot on the earlier R6 models and would benefit from the advanced functionality the new slot will give you, especially if you shoot a lot of RAW imagery and video.

The Canon RF 14mm f/1.4 lens stood up on a brown carpet.

Wide aperture lenses, like an f/1.4 lens, can deliver exceptional low-light performance but they are also extremely expensive, so buyers should consider how they want to invest in their camera gear. (Image credit: Harry Bennett / Future)

Stick with an earlier model or a different mirrorless camera if you are a very casual astrophotographer who does most of your shooting in the daytime. I just can't justify the massive jump in price for basic shooting, where a beginner or intermediate photographer's money might be better spent on getting a fast f/1.4 lens for superior astro. I used the Canon RF 14mm f/1.4 lens for astrophotography testing and I don't think the images would have looked half as good if I had used a lens with a smaller aperture. If you already own the R6 II, the only reason you might upgrade is if you need to do more heavy cropping into your images or need better hybrid video functionality from a camera.

Billions of miles and thousands of years in the making: This is the life of a Perseid shooting star

21 July 2026 at 19:00

Picture it: A slash of vivid green light splits the starry sky. There for a moment and then gone, leaving nothing but a short-lived glowing trail and a moment of pure joy. You've finally caught it, your first Perseid shooting star of the season.

What you saw was the final moment of a story billions of miles and thousands of years in the making. A story that began with that same shooting star locked inside the icy body of the wandering comet 109P/Swift-Tuttle.

The 16-mile-wide (26 kilometer) giant of a comet spends its life journeying back and forth between the outer and inner solar system, where its frigid body is heated by the sun, triggering dramatic outbursts of activity. While in close proximity to our star, ice near to the surface of the comet is transformed into gas, skipping the water stage entirely as it escapes out into the vastness of interplanetary space.

Embedded within that ice was once a micrometeoroid no larger than a grain of sand, destined to become the Perseid shooting star you saw.

The violence of the newborn micrometeoroid's exile was followed by an epoch of utter silence, as its orbit was subtly influenced by the unseen forces of the solar system. It would be easy to think of this as a lonely existence, but we'd be wrong.

Our cosmic pebble was joined by millions of others, all shed in the wake of Swift-Tuttle. A great stream of primordial material that threads through the inner solar system, crossing the path of Earth before extending in a great swarm that messily traces the elliptical orbit of their comet progenitor, below the plane of the solar system. Beyond the orbit of Pluto.

Each follows its own unique path. Trajectories are shaped by the force of a micrometeoroid's expulsion from the comet's nucleus, along with the gentle push of radiation from the sun and the gravitational tug of the planets.

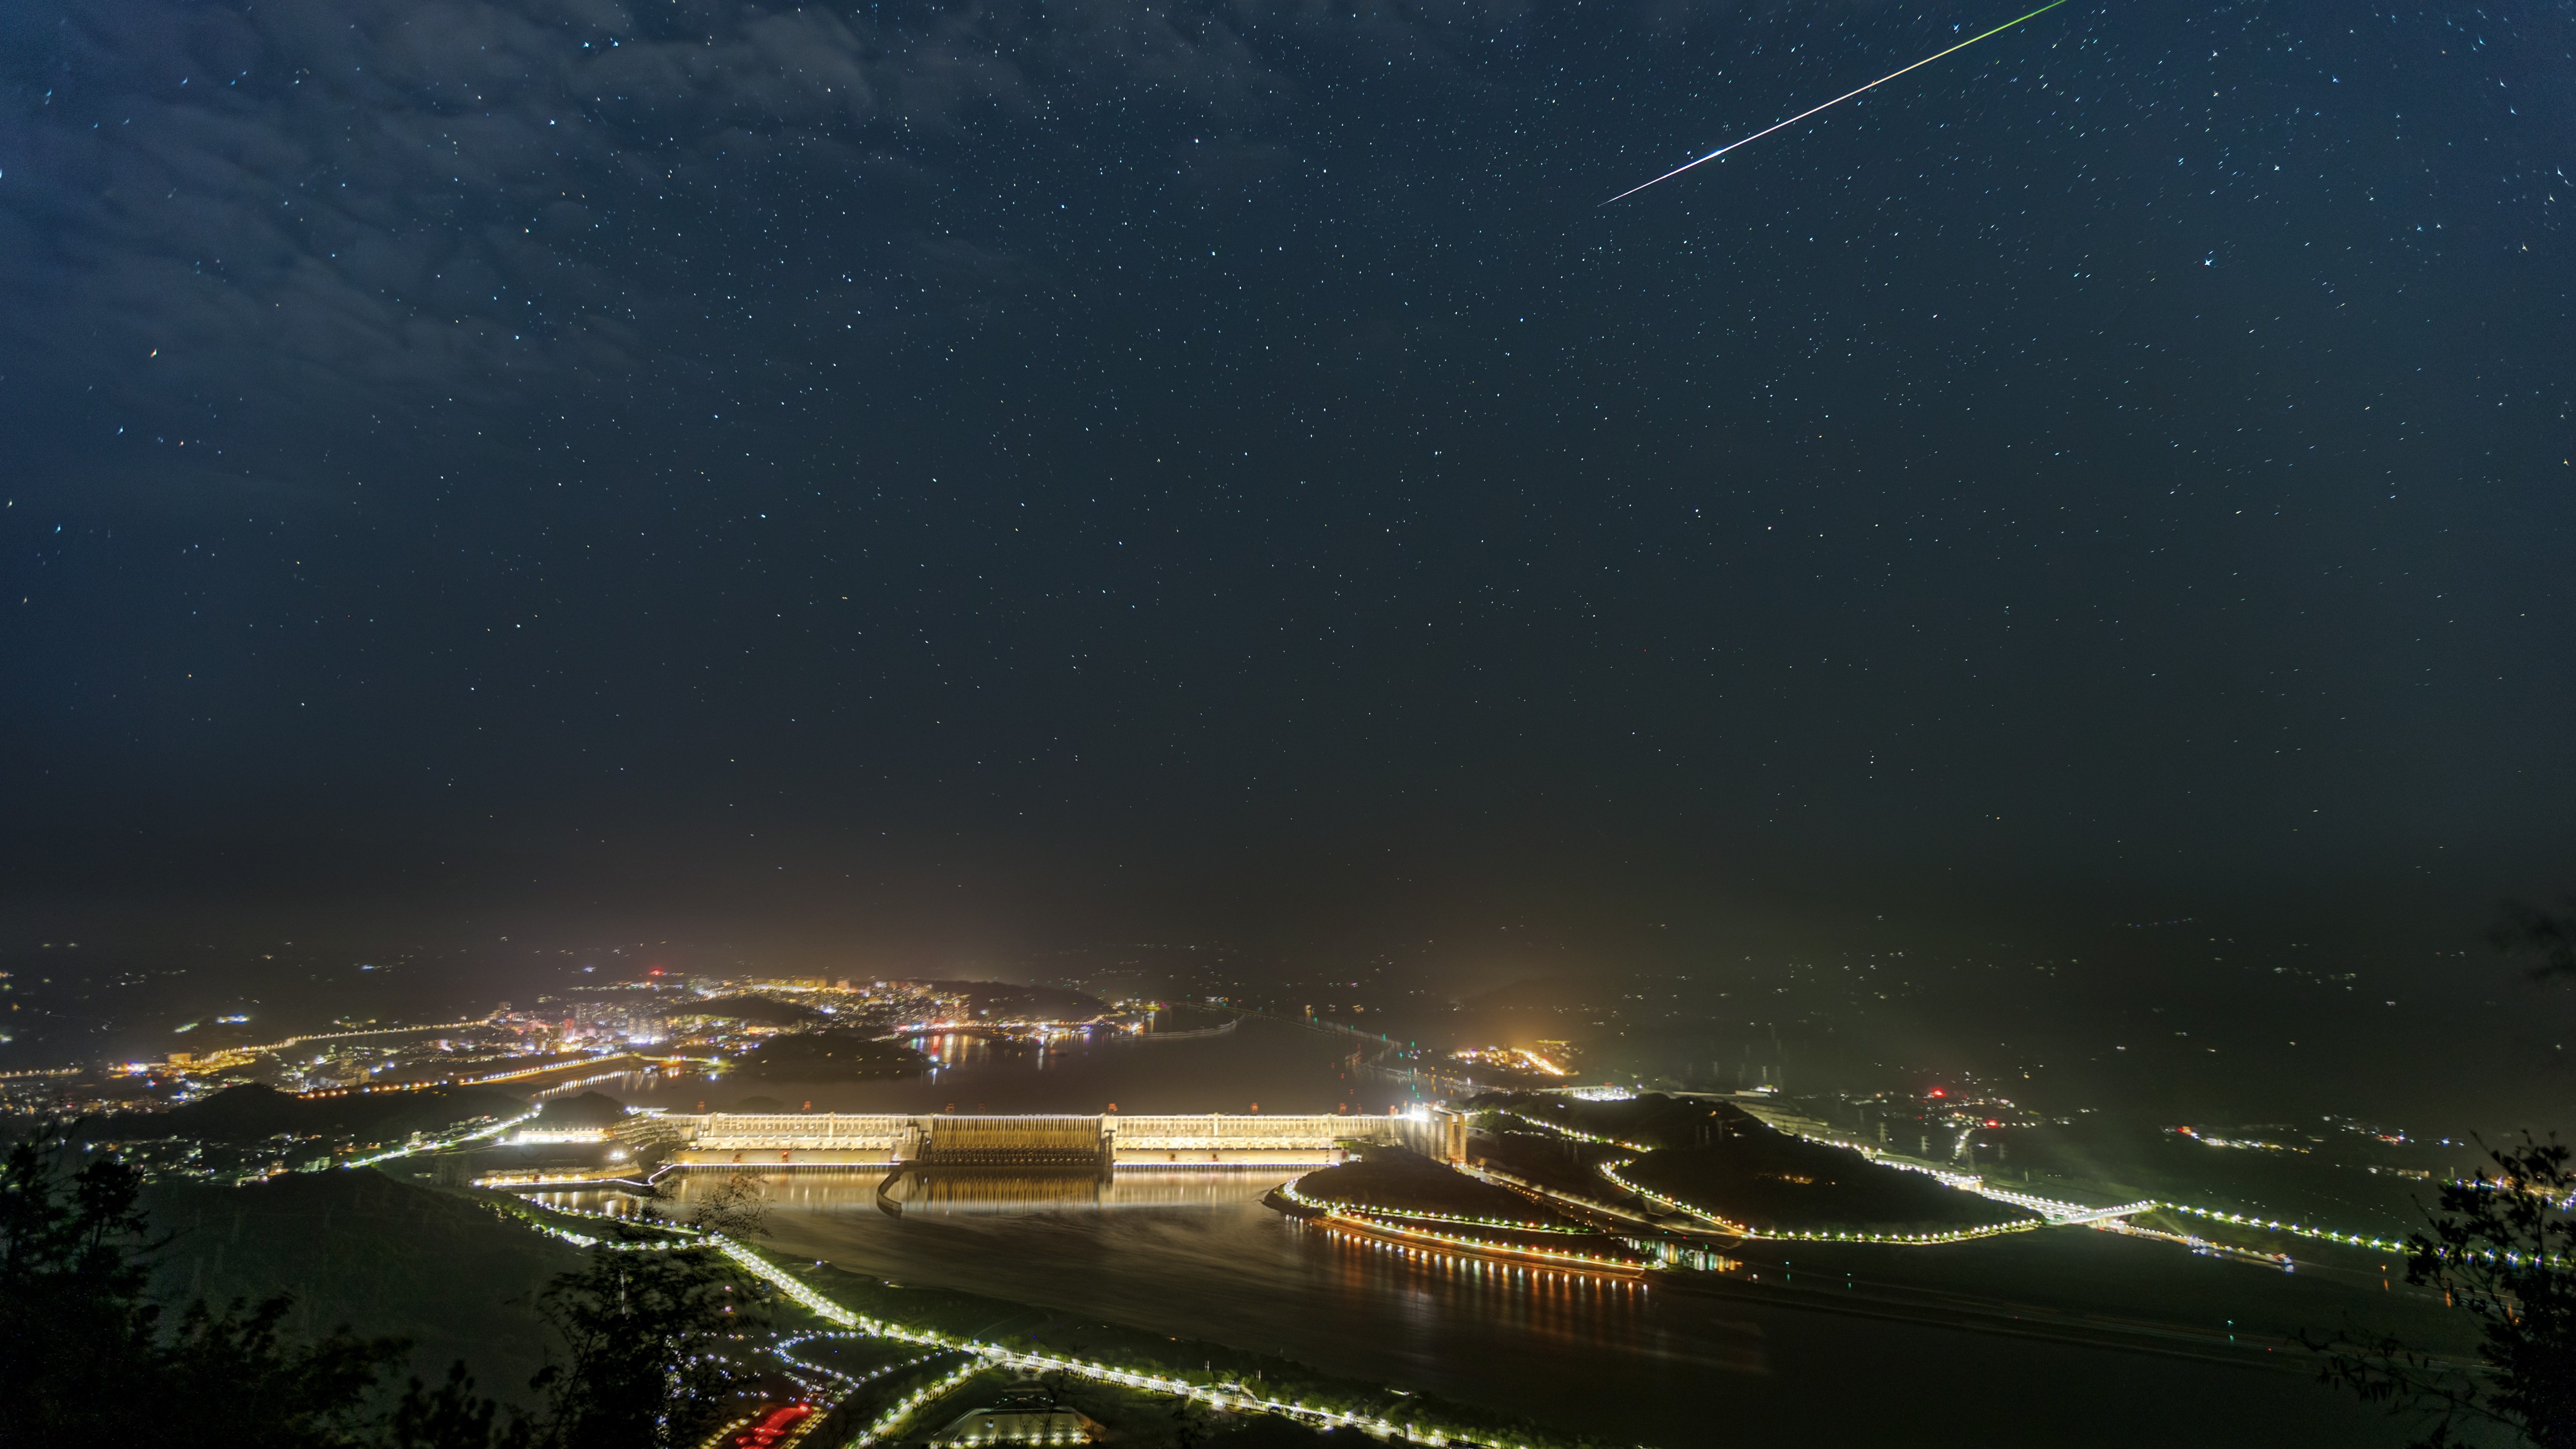
A meteor streaks earthward through a starry sky above an illuminated city.

A perseid blazes earthward over Hubei province in China. (Image credit: Photo credit should read CFOTO/Future Publishing via Getty Images))

It's impossible to know how long our shooting star drifted through the cold expanse of interplanetary space. Was it hundreds or many thousands of years? How many times might it have journeyed around the sun before its fateful rendezvous with our Blue Marble?

We can never know. What we do know is how its journey ended.

Civilizations could have risen to their zenith and crumbled in the time our micrometeoroid spent traversing the unfeeling expanse of interplanetary space, but its demise lasted but a fraction of a second. It collided with our planet's gaseous shell at 132,000 miles per hour (212,433 kmph), cutting a brilliant green trail through the summer sky as atmospheric friction vaporized the cometary shard.

It's that fiery demise that you spotted tonight β€” an experience that will repeat hundreds of times each and every hour at the height of the Perseid meteor shower, as Earth passes through the densest part of the debris stream cast off by comet Swift-Tuttle.

Nikon Z8

Nikon Z8 on a white table

(Image credit: Jase Parnell-Brookes)

The Nikon Z8 excels in just about every department and we rate it as the best overall camera out there. It features a full-frame 45.7MP sensor, 8K video capabilities and excellent low-light performance. Check out our Nikon Z8 review for more!

The Perseid meteor shower is active from now until Aug. 24, with the best viewing window occurring in the early hours of Aug. 13, as the shower's radiant rises to its highest point on the night of the shower's peak.

This year's peak will be particularly spectacular, unfolding as it does in the pristinely dark skies surrounding the Aug. 12 new moon, which will also cause a spectacular total solar eclipse to be visible across parts of Spain, Iceland and Greenland. If you find yourself in the path of totality and have luck on your side, then you might just spot a Perseid fireball brightening the false twilight that falls as the moon hides the face of the sun at the crescendo of the eclipse!

Want to capture a shooting star that will stay with you forever? Then be sure to read our guide to photographing fast-moving meteors, along with our roundups of the best cameras and lenses for astrophotography if you're looking to upgrade your gear.

Editor's Note: Did you catch a photo of a Perseid shooting star and want to share it with Space.com's readers? Then please go ahead and send your photos along with your comments, name and location to spacephotos@space.com.

❌